Introduction
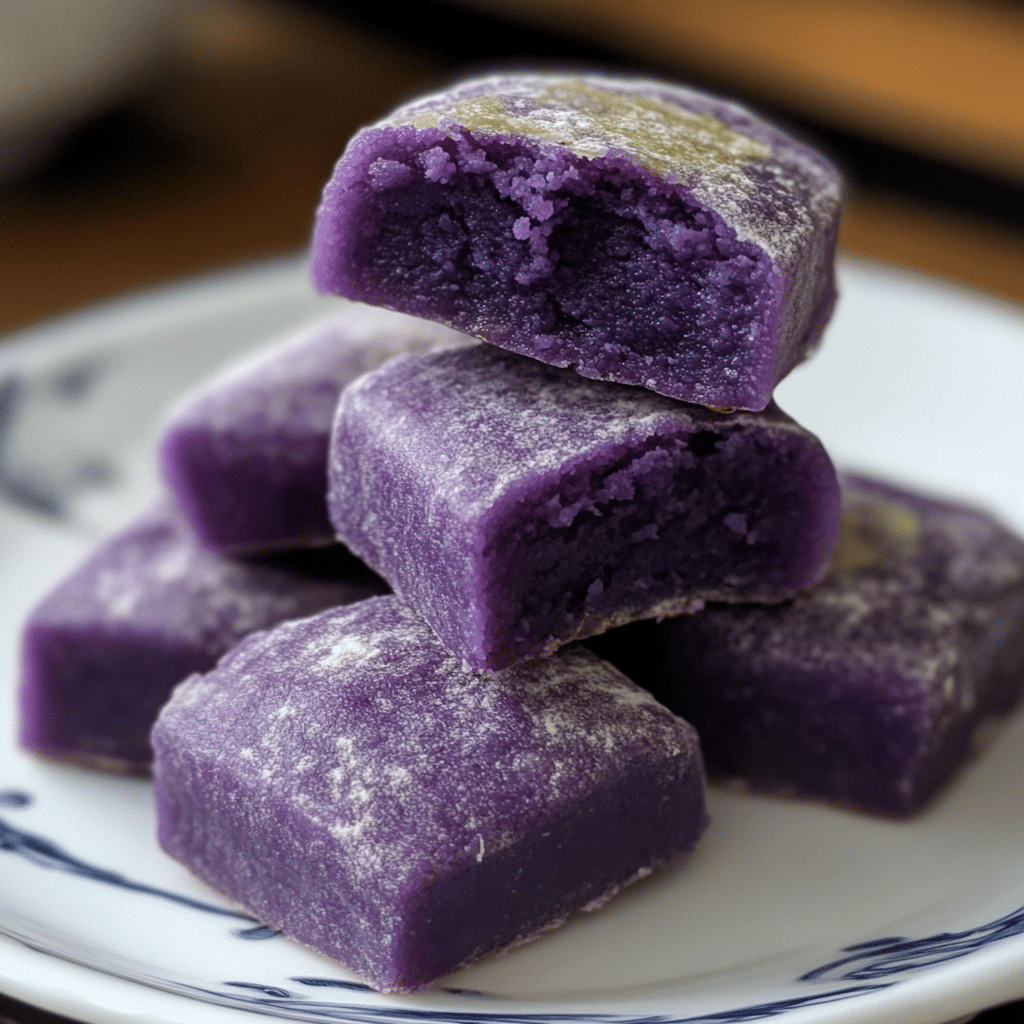
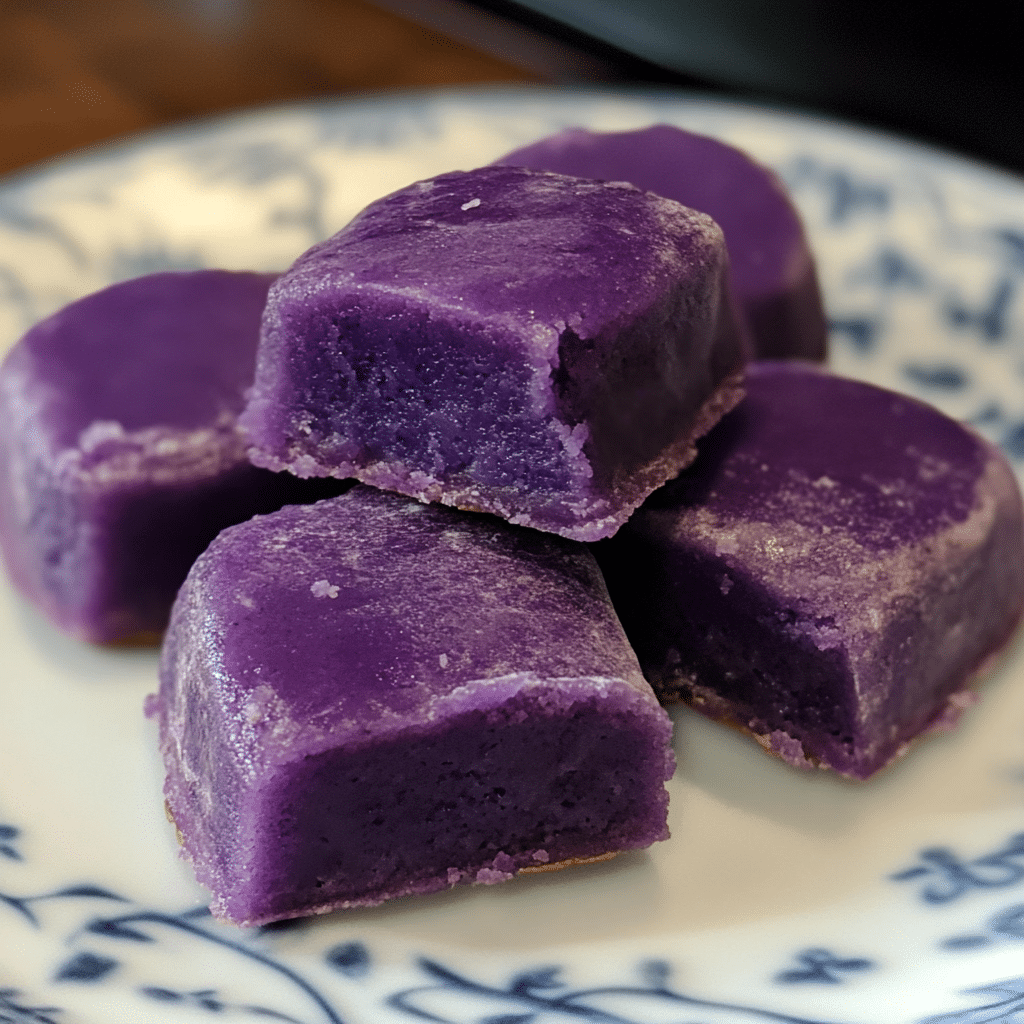
If you’ve never tried ube mochi, you’re in for a treat—literally! Picture this: a chewy, sweet mochi filled with the unique flavor of ube (a purple yam), all wrapped up in a soft, sticky dough that’s both comforting and exciting. There’s something about this dessert that feels like a cozy hug. It’s not just your typical sweet; the ube gives it a lovely, earthy depth that makes it different from any other mochi you’ve had before.
I first discovered ube mochi on a visit to a Filipino bakery, where the bright purple hue immediately caught my eye. The flavor was unlike anything I’d ever tasted—sweet, subtly nutty, and so incredibly smooth. That was it—I was hooked! Ever since then, I’ve been perfecting my version of ube mochi, and I can confidently say it’s one of my go-to desserts when I’m craving something sweet, chewy, and uniquely flavored.
Whether you’re new to the world of ube or you’ve been a fan for years, this recipe will show you how to make the perfect ube mochi right at home. It’s easier than you think, and the end result is a treat that’ll impress everyone who gets a bite. So grab your ingredients, roll up your sleeves, and let’s get baking!
Why You’ll Love This Ube Mochi Recipe
Here’s why this recipe is bound to become a favorite in your kitchen:
- Easy to Make: You don’t need any fancy equipment, and the ingredients are simple—just ube, glutinous rice flour, sugar, and a few pantry staples. If you’ve never made mochi before, this is a great recipe to start with!
- Sweet and Savory: Ube’s natural sweetness is enhanced by the chewy, slightly sweet mochi dough. The combination is irresistible.
- Customizable: Want to make it vegan or gluten-free? You can! This recipe is versatile and easily adaptable to your dietary preferences.
- Perfect for Sharing: Ube mochi is a great dessert for potlucks, family gatherings, or just a cozy treat at home. It’s fun to make and even more fun to share with loved ones.
I promise, after you make these once, you’ll want to make them again and again. And once you taste the soft, chewy texture and the vibrant flavor of ube, you’ll understand why this treat is so beloved in Filipino culture and beyond.
Preparation Time and Servings
- Total Time: 1 hour
- Preparation Time: 15 minutes
- Cooking Time: 30 minutes
- Cooling Time: 15 minutes
- Servings: This recipe makes about 12-15 pieces of ube mochi, perfect for sharing or enjoying all to yourself!
Nutrition Facts (per serving):
- Calories: 150
- Carbs: 35g
- Protein: 2g
- Fat: 0g
(Please note that nutritional information can vary depending on ingredient brands and portion sizes.)
Ingredients
To make these delicious ube mochi, here’s what you’ll need:
- 1 cup ube halaya (ube jam) – This is the star of the show! Ube halaya is made from purple yam and gives the mochi that signature purple color and sweet flavor. You can buy it pre-made at most Filipino or Asian grocery stores or make it at home.
- 1 cup glutinous rice flour (also called mochiko) – This is essential for giving the mochi its chewy, sticky texture. Don’t confuse it with regular rice flour; glutinous rice flour is what makes mochi so irresistibly chewy!
- ¾ cup sugar – This adds sweetness to the dough, balancing the earthy flavor of the ube.
- 1 cup coconut milk – For a smooth, creamy texture. Coconut milk is key to enhancing the flavor and making the dough soft and tender.
- 1 tablespoon butter – Adds richness to the dough. You can substitute with vegan butter for a dairy-free version.
- Pinch of salt – Just a tiny bit to balance out the sweetness of the ube and sugar.
- Cornstarch or potato starch (for dusting) – This is optional but helps keep the mochi from being too sticky when you cut it into pieces.
Step-by-Step Instructions
Step 1: Prepare Your Ingredients
Before you dive into making the mochi, make sure you have all of your ingredients measured and ready to go. It’s always good to prep your ingredients ahead of time so you can just mix and go! If you’re using store-bought ube halaya, give it a quick stir to make sure it’s nice and smooth.
Step 2: Mix the Mochi Dough
In a medium-sized saucepan, combine the glutinous rice flour and sugar. Stir until they’re well combined. Then, add in the coconut milk, butter, and pinch of salt. Stir everything together until smooth.
Next, add in the ube halaya and mix until it’s fully incorporated. The dough should have a light purple color and a smooth, creamy texture. If it seems too thick, you can add a little more coconut milk, one tablespoon at a time, until you reach a thick but pourable consistency.
Step 3: Cook the Dough
Place the saucepan over medium heat. Stir constantly as the mixture heats up. It will begin to thicken within a few minutes. Keep stirring so that the dough doesn’t burn or stick to the bottom of the pan.
After about 5-7 minutes, the dough will become thicker and more like a paste. It’s ready when you can see the bottom of the pan when you stir it, and the mixture is smooth and sticky. Turn off the heat, and let it cool for about 5 minutes.
Step 4: Shape the Mochi
Once the dough has cooled slightly but is still warm and pliable, it’s time to shape the mochi. Sprinkle a clean surface or large plate with cornstarch or potato starch to prevent the mochi from sticking.
Using your hands or a spoon, scoop out small portions of dough (about 1-2 tablespoons each). Roll each piece into a ball or flatten it into a small disk, about 1-2 inches in diameter. Place each shaped mochi on the prepared plate, dusting with more cornstarch to prevent sticking.
Step 5: Let the Mochi Cool
Let the ube mochi cool to room temperature. This will take about 15 minutes, and it’ll firm up as it cools. If you’re making these in advance, you can store them in an airtight container in the fridge for up to 3 days.
How to Serve Ube Mochi
Ube mochi is delicious on its own, but it can also be served in a variety of ways:
- Enjoy it with a cup of tea or coffee – The chewy texture of the mochi pairs perfectly with a warm beverage.
- Top it with coconut flakes – For an added texture, roll your mochi in shredded coconut before serving.
- Pair it with ice cream – If you’re feeling indulgent, serve the mochi alongside a scoop of coconut or vanilla ice cream.
- Serve it at parties or potlucks – Ube mochi is a fun, vibrant treat that’ll definitely be a conversation starter.
Additional Tips for Success
- Use good-quality ube halaya: The quality of the ube halaya really makes a difference in the flavor. If you can, try to find the best ube halaya you can get your hands on.
- Don’t skip the starch: Dusting your mochi in cornstarch is essential. It keeps the mochi from being too sticky and helps give it that signature soft bite.
- Watch the temperature: Make sure the dough is warm, but not too hot, when you shape the mochi. If it’s too hot, it might be too sticky to handle.
Recipe Variations
- Vegan Ube Mochi: You can easily make this recipe vegan by substituting the butter with plant-based butter or coconut oil and making sure the ube halaya is dairy-free.
- Gluten-Free Ube Mochi: This recipe is naturally gluten-free thanks to the use of glutinous rice flour, but make sure that your ube halaya doesn’t contain any hidden gluten (check the label if you’re buying store-bought).
- Chocolate Ube Mochi: Add some cocoa powder to the dough to make a delicious chocolate-ube fusion! Just substitute about 2 tablespoons of the glutinous rice flour for cocoa powder.
Serving Suggestions
Pair your ube mochi with:
- Side Dishes: Serve with a tropical fruit salad or fried banana fritters (a Filipino classic)!
- Beverages: Ube mochi pairs beautifully with green tea, a coconut-based smoothie, or even a nice chilled glass of mango juice.
Freezing and Storage
You can store leftover ube mochi in an airtight container in the fridge for up to 3 days. If you want to keep them for longer, they freeze well too! Just wrap each piece in plastic wrap, place them in a freezer-safe bag, and store them in the freezer for up to 1 month. To defrost, let them sit at room temperature for about 10-15 minutes.
Frequently Asked Questions (FAQ)
1. What is ube?
Ube is a type of purple yam native to the Philippines. It has a distinct, sweet flavor with a subtle nutty undertone. Ube is often used in Filipino desserts like ube halaya (ube jam), ice cream, and cakes, and is easily recognized by its vibrant purple color.
2. Can I use regular sweet potato instead of ube?
While regular sweet potato can work as a substitute in some recipes, it won’t give you the same distinctive flavor or purple hue that ube provides. If you’re looking for that authentic ube taste, I recommend finding ube halaya (ube jam) from a Filipino or Asian grocery store.
3. Can I make my own ube halaya (ube jam)?
Yes! Making ube halaya at home is a great option if you can’t find it pre-made. It involves boiling ube, mashing it, and cooking it with sugar and coconut milk. There are many recipes online that walk you through the process. It’s a bit time-consuming but totally worth it for that homemade flavor.
4. Where can I find glutinous rice flour (mochiko)?
Glutinous rice flour, also known as mochiko, can usually be found in Asian grocery stores or online. Be sure to look for “glutinous” or “sticky” rice flour, as this is the one used in making mochi. It’s different from regular rice flour, which won’t give the same chewy texture.
5. Can I make this recipe gluten-free?
Yes! The recipe is already naturally gluten-free because it uses glutinous rice flour, which doesn’t contain gluten. Just make sure that the ube halaya you use is also gluten-free (though most pre-made ube jams are, it’s always good to double-check the label).
Print
Ube Mochi Recipe
- Total Time: 1 hour
Ingredients
- 1 cup ube halaya (ube jam) – This is the star of the show! Ube halaya is made from purple yam and gives the mochi that signature purple color and sweet flavor. You can buy it pre-made at most Filipino or Asian grocery stores or make it at home.
- 1 cup glutinous rice flour (also called mochiko) – This is essential for giving the mochi its chewy, sticky texture. Don’t confuse it with regular rice flour; glutinous rice flour is what makes mochi so irresistibly chewy!
- ¾ cup sugar – This adds sweetness to the dough, balancing the earthy flavor of the ube.
- 1 cup coconut milk – For a smooth, creamy texture. Coconut milk is key to enhancing the flavor and making the dough soft and tender.
- 1 tablespoon butter – Adds richness to the dough. You can substitute with vegan butter for a dairy-free version.
- Pinch of salt – Just a tiny bit to balance out the sweetness of the ube and sugar.
- Cornstarch or potato starch (for dusting) – This is optional but helps keep the mochi from being too sticky when you cut it into pieces.
Instructions
Step 1: Prepare Your Ingredients
Before you dive into making the mochi, make sure you have all of your ingredients measured and ready to go. It’s always good to prep your ingredients ahead of time so you can just mix and go! If you’re using store-bought ube halaya, give it a quick stir to make sure it’s nice and smooth.
Step 2: Mix the Mochi Dough
In a medium-sized saucepan, combine the glutinous rice flour and sugar. Stir until they’re well combined. Then, add in the coconut milk, butter, and pinch of salt. Stir everything together until smooth.
Next, add in the ube halaya and mix until it’s fully incorporated. The dough should have a light purple color and a smooth, creamy texture. If it seems too thick, you can add a little more coconut milk, one tablespoon at a time, until you reach a thick but pourable consistency.
Step 3: Cook the Dough
Place the saucepan over medium heat. Stir constantly as the mixture heats up. It will begin to thicken within a few minutes. Keep stirring so that the dough doesn’t burn or stick to the bottom of the pan.
After about 5-7 minutes, the dough will become thicker and more like a paste. It’s ready when you can see the bottom of the pan when you stir it, and the mixture is smooth and sticky. Turn off the heat, and let it cool for about 5 minutes.
Step 4: Shape the Mochi
Once the dough has cooled slightly but is still warm and pliable, it’s time to shape the mochi. Sprinkle a clean surface or large plate with cornstarch or potato starch to prevent the mochi from sticking.
Using your hands or a spoon, scoop out small portions of dough (about 1-2 tablespoons each). Roll each piece into a ball or flatten it into a small disk, about 1-2 inches in diameter. Place each shaped mochi on the prepared plate, dusting with more cornstarch to prevent sticking.
Step 5: Let the Mochi Cool
Let the ube mochi cool to room temperature. This will take about 15 minutes, and it’ll firm up as it cools. If you’re making these in advance, you can store them in an airtight container in the fridge for up to 3 days.
- Prep Time: 15 minutes
- Cook Time: 30 minutes
Nutrition
- Serving Size: 15
- Calories: 150
- Carbohydrates: 35g
- Protein: 2g
Conclusion
Making ube mochi at home is easier than it seems, and the result is absolutely worth it. The soft, chewy texture paired with the earthy sweetness of ube is a match made in dessert heaven. Whether you’re making these for a special occasion or just because, I promise that these little purple treats will bring a smile to your face—and everyone else’s who gets to try them!
Give this ube mochi recipe a try the next time you’re craving something sweet and chewy. Trust me, once you make it, you’ll be hooked for life!

