Introduction
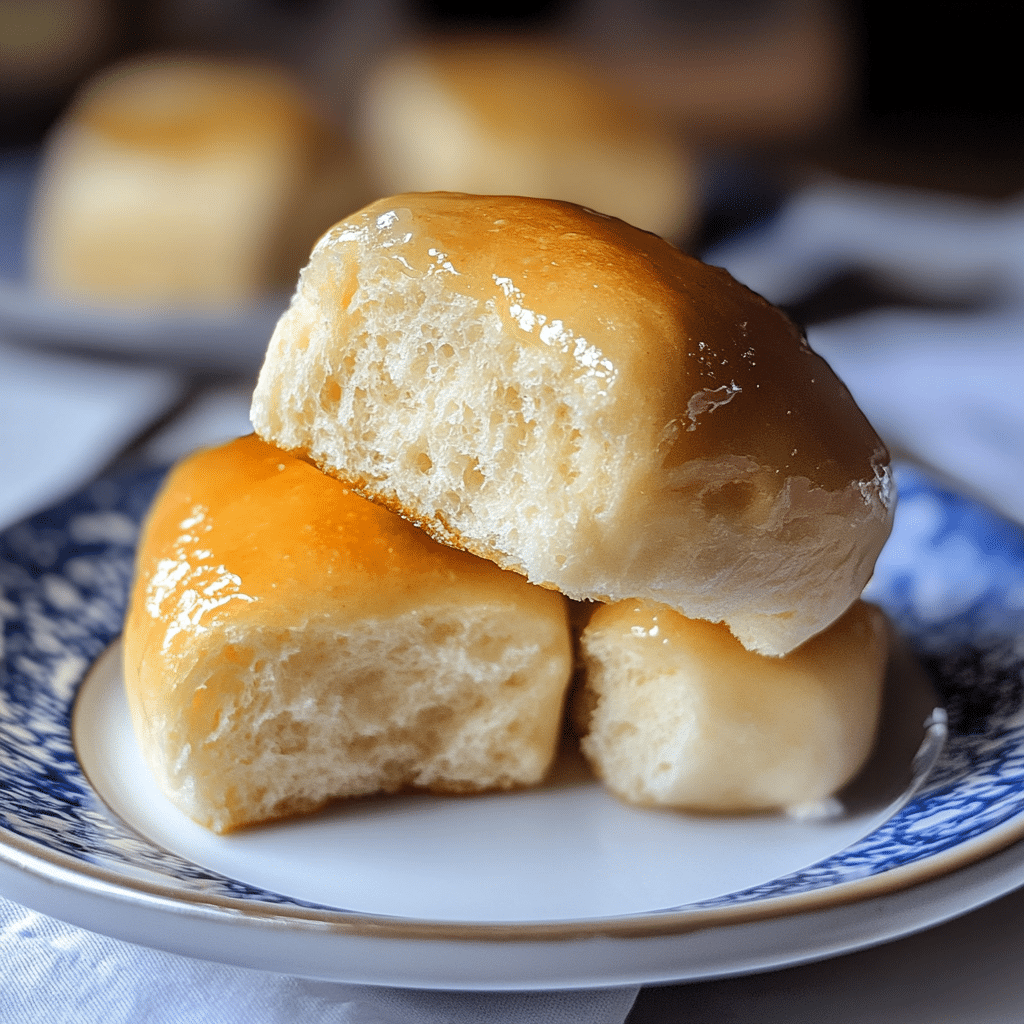
Let me tell you a little secret—if you’ve been searching for the perfect gluten-free roll that’s soft, fluffy, and delicious, you’ve just hit the jackpot! These Pillowy Soft Gluten-Free Rolls are not only gluten-free but also so tender and light that you’ll forget you’re eating gluten-free bread. Perfect for sandwiches, dipping into soups, or simply enjoying with a pat of butter, these rolls will soon become a staple in your kitchen.
I first started baking gluten-free when my cousin was diagnosed with celiac disease, and it was a challenge to find something that matched the texture of regular bread. After many failed attempts, I finally found a method that works wonders, and these rolls have become a family favorite at every gathering. Trust me, even if you’re new to gluten-free baking, you can make these with ease!
Why You’ll Love This Recipe
These rolls are a game-changer! Here’s why you’ll love making (and eating) them:
- Easy to make: The recipe requires simple ingredients that you probably already have in your pantry if you’re gluten-free. Plus, no fancy equipment is required!
- Super soft texture: Even without gluten, these rolls are light and fluffy thanks to a blend of gluten-free flours and a secret ingredient—psyllium husk—which adds that perfect bread-like texture.
- Versatile: You can enjoy these rolls in so many ways—slice them for sandwiches, serve them alongside soups, or just tear one apart and slather it with butter.
- Family-approved: Kids love them! The subtle sweetness and soft texture make them perfect for everyone in the family, even those who aren’t on a gluten-free diet.
You’ll be amazed at how similar these are to traditional rolls. Plus, they freeze well, so you can always have them on hand for quick meals!
Preparation Time and Servings
- Total Time: 2 hours (including rising time)
- Servings: 12 rolls
- Calories per serving: 140
- Protein: 3g
- Carbs: 30g
- Fat: 2g
Ingredients
To make these delicious gluten-free rolls, you’ll need the following ingredients:
- 2 cups gluten-free flour blend (make sure it’s a 1-to-1 baking blend)
- 1/2 cup tapioca starch (for added softness)
- 1 tablespoon psyllium husk powder (this helps bind the dough and create the perfect texture)
- 1 tablespoon sugar (or honey, for a slightly sweet touch)
- 2 teaspoons instant yeast (to give the rolls that perfect rise)
- 1 teaspoon salt
- 1 cup warm milk (or plant-based milk for a dairy-free option)
- 2 tablespoons olive oil (you can substitute melted butter if not dairy-free)
- 2 large eggs (room temperature)
- 1 teaspoon apple cider vinegar (helps with the dough’s elasticity)
Optional Toppings:
- Sesame seeds, poppy seeds, or a sprinkle of coarse salt for extra flavor and texture.
Step-by-Step Instructions
Here’s how to make your very own Pillowy Soft Gluten-Free Rolls from scratch:
1st Step: Prepare the yeast mixture
- In a small bowl, combine 1 cup of warm milk (about 110°F) with the 2 teaspoons of yeast and 1 tablespoon of sugar. Let it sit for 5-10 minutes until the yeast activates and becomes frothy. If your yeast doesn’t bubble, it may be old, so start over with fresh yeast.
2nd step: Mix the dry ingredients
- In a large mixing bowl, whisk together the gluten-free flour blend, tapioca starch, psyllium husk powder, and salt. The psyllium husk is key here—it gives the dough elasticity that gluten-free flours typically lack.
3rd step: Combine wet and dry ingredients
- In a separate bowl, beat the eggs, olive oil, and apple cider vinegar. Slowly pour this mixture into the dry ingredients, followed by the yeast mixture.
- Using a wooden spoon (or a stand mixer if you have one), stir until the dough comes together. The dough will be sticky—this is normal for gluten-free baking.
4th step: Let the dough rise
- Cover the bowl with plastic wrap or a clean kitchen towel, and let the dough rise in a warm place for about 1 hour. The dough should double in size. To create a warm environment, I like to place the bowl in the oven with just the light on.
5th step: Shape the rolls
- After the dough has risen, punch it down gently to release any air bubbles. Flour your hands lightly with gluten-free flour and divide the dough into 12 equal portions. Roll each piece into a ball, and place the rolls on a baking sheet lined with parchment paper.
- Here’s a tip: To make sure your rolls are all the same size, use a kitchen scale to weigh the dough portions.
6th step: Final rise
- Once shaped, cover the rolls loosely with a clean towel and let them rise for another 30 minutes. They’ll puff up slightly during this time.
7th step: Preheat and bake
- While the rolls are rising, preheat your oven to 375°F (190°C). Before placing the rolls in the oven, brush them lightly with a bit of olive oil or milk to give them a golden-brown finish. If you like, you can sprinkle some sesame seeds or coarse salt on top for extra flavor.
- Bake the rolls for 18-22 minutes, or until the tops are golden brown and the rolls sound hollow when tapped.
8th step: Cool and enjoy
- Remove the rolls from the oven and let them cool for a few minutes on a wire rack. These rolls are best served warm, so slice one open and enjoy it with a little butter!
How to Serve
Here are some serving suggestions to enjoy these soft gluten-free rolls:
- As a sandwich base: Cut the roll in half and fill it with your favorite deli meats, cheese, and fresh veggies.
- Alongside soups or stews: These rolls are perfect for soaking up broth from a hearty chicken soup or beef stew.
- With breakfast: Spread some jam or butter on a warm roll and serve it alongside eggs and bacon for a simple but satisfying breakfast.
Don’t be surprised if you find yourself making these rolls for every occasion—they’re that good!
Additional Tips
Here are a few tips to ensure your Pillowy Soft Gluten-Free Rolls turns out perfectly every time:
- Use fresh yeast: Make sure your yeast is active and fresh. Old yeast won’t give you the fluffy rise you want in these rolls.
- Don’t skip the psyllium husk powder: This ingredient helps bind the gluten-free flours and gives the dough elasticity, making the rolls soft and airy.
- Room temperature eggs: Cold eggs can affect the rise of the dough, so it’s best to use them at room temperature.
- Check your oven: If your rolls are browning too quickly, you can tent them with aluminum foil halfway through baking.
- Freezing tip: These rolls freeze well! After baking, let them cool completely, then freeze them in an airtight bag. When you’re ready to enjoy, pop them in the oven at 350°F for about 10 minutes to warm them up.
Recipe Variations
Want to switch things up? Here are some fun variations:
- Herb and Garlic Rolls: Add 1 tablespoon of fresh chopped rosemary or thyme to the dough for a fragrant, savory twist.
- Dairy-Free Option: Use almond milk or coconut milk in place of regular milk, and substitute the eggs with a flax egg (1 tablespoon ground flaxseed + 3 tablespoons water).
- Cinnamon Sugar Rolls: For a sweeter version, roll the dough balls in a mixture of cinnamon and sugar before baking. These make a delicious breakfast treat!
Freezing and Storage
If you have leftovers (although that’s unlikely!), here’s how to store and freeze your gluten-free rolls:
- Storage: Store the rolls in an airtight container at room temperature for up to 3 days. To keep them soft, you can wrap them in a clean kitchen towel before placing them in the container.
- Freezing: Once the rolls are completely cooled, wrap them individually in plastic wrap and store them in a freezer-safe bag. They’ll stay fresh for up to 3 months.
- Reheating: To reheat frozen rolls, preheat your oven to 350°F and bake for 8-10 minutes until warm.
Special Equipment
You don’t need much to make these rolls, but here are a few items that will come in handy:
- Mixing bowl: A large bowl for mixing the dough.
- Parchment paper: To line your baking sheet for easy cleanup.
- Wire rack: For cooling the rolls evenly after baking.
- Measuring cups and spoons: For precise ingredient measurements.
FAQ Section
Can I use a different gluten-free flour blend? Yes, but make sure it’s a 1-to-1 baking blend that includes xanthan gum. Otherwise, you’ll need to add 1/2 teaspoon of xanthan gum to the recipe.
Can I make these dairy-free? Absolutely! Use plant-based milk and substitute olive oil for butter.
My rolls didn’t rise—what went wrong? Make sure your yeast is active. If the yeast mixture didn’t become frothy in Step 1, it may be expired or the liquid was too hot, killing the yeast.
PrintPillowy Soft Gluten-Free Rolls
- Total Time: 2 hours
Ingredients
To make these delicious gluten-free rolls, you’ll need the following ingredients:
- 2 cups gluten-free flour blend (make sure it’s a 1-to-1 baking blend)
- 1/2 cup tapioca starch (for added softness)
- 1 tablespoon psyllium husk powder (this helps bind the dough and create the perfect texture)
- 1 tablespoon sugar (or honey, for a slightly sweet touch)
- 2 teaspoons instant yeast (to give the rolls that perfect rise)
- 1 teaspoon salt
- 1 cup warm milk (or plant-based milk for a dairy-free option)
- 2 tablespoons olive oil (you can substitute melted butter if not dairy-free)
- 2 large eggs (room temperature)
- 1 teaspoon apple cider vinegar (helps with the dough’s elasticity)
Instructions
Step 1: Prepare the yeast mixture
- In a small bowl, combine 1 cup of warm milk (about 110°F) with the 2 teaspoons of yeast and 1 tablespoon of sugar. Let it sit for 5-10 minutes until the yeast activates and becomes frothy. If your yeast doesn’t bubble, it may be old, so start over with fresh yeast.
Step 2: Mix the dry ingredients
- In a large mixing bowl, whisk together the gluten-free flour blend, tapioca starch, psyllium husk powder, and salt. The psyllium husk is key here—it gives the dough elasticity that gluten-free flours typically lack.
Step 3: Combine wet and dry ingredients
- In a separate bowl, beat the eggs, olive oil, and apple cider vinegar. Slowly pour this mixture into the dry ingredients, followed by the yeast mixture.
- Using a wooden spoon (or a stand mixer if you have one), stir until the dough comes together. The dough will be sticky—this is normal for gluten-free baking.
Step 4: Let the dough rise
- Cover the bowl with plastic wrap or a clean kitchen towel, and let the dough rise in a warm place for about 1 hour. The dough should double in size. To create a warm environment, I like to place the bowl in the oven with just the light on.
Step 5: Shape the rolls
- After the dough has risen, punch it down gently to release any air bubbles. Flour your hands lightly with gluten-free flour and divide the dough into 12 equal portions. Roll each piece into a ball, and place the rolls on a baking sheet lined with parchment paper.
- Here’s a tip: To make sure your rolls are all the same size, use a kitchen scale to weigh the dough portions.
Step 6: Final rise
- Once shaped, cover the rolls loosely with a clean towel and let them rise for another 30 minutes. They’ll puff up slightly during this time.
Step 7: Preheat and bake
- While the rolls are rising, preheat your oven to 375°F (190°C). Before placing the rolls in the oven, brush them lightly with a bit of olive oil or milk to give them a golden-brown finish. If you like, you can sprinkle some sesame seeds or coarse salt on top for extra flavor.
- Bake the rolls for 18-22 minutes, or until the tops are golden brown and the rolls sound hollow when tapped.
Step 8: Cool and enjoy
- Remove the rolls from the oven and let them cool for a few minutes on a wire rack. These rolls are best served warm, so slice one open and enjoy it with a little butter!
Nutrition
- Serving Size: 12
- Calories: 140
- Fat: 2g
- Carbohydrates: 30g
- Protein: 3g
Conclusion
There’s nothing quite like the satisfaction of baking your own gluten-free bread, especially when it turns out as soft and delicious as these rolls. Whether you’re new to gluten-free baking or a seasoned pro, this recipe will become a favorite. The tender crumb, subtle sweetness, and irresistible flavor make these rolls a winner for any meal.
So go ahead, give these Pillowy Soft Gluten-Free Rolls a try! You’ll love how easy they are to make—and even more, how good they taste.

