Introduction
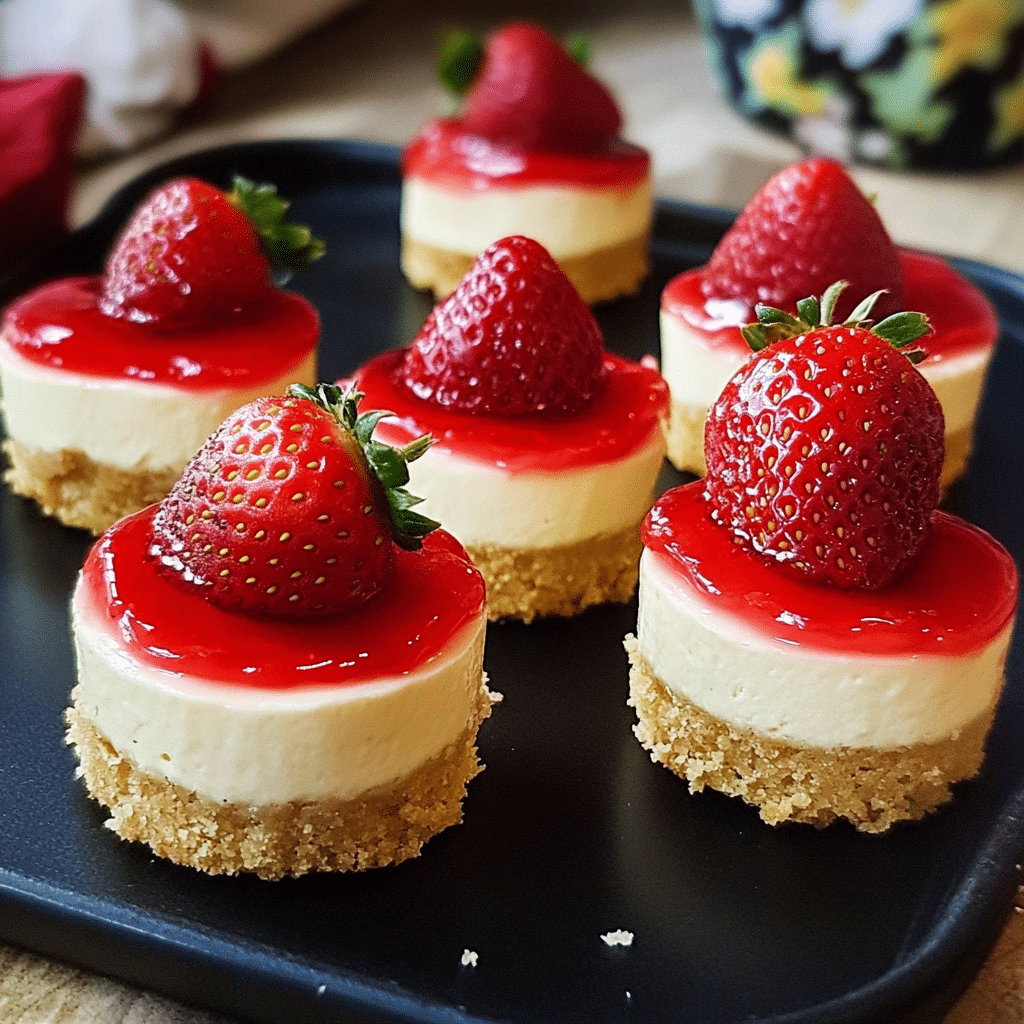
There’s something so special about individual desserts, especially when they come in the form of these adorable, perfectly portioned Mini Strawberry Cheesecakes. They’re like the perfect bite-sized treat, offering all the creamy, dreamy goodness of cheesecake, but without the fuss of slicing up a whole cake.
I first came up with this recipe one summer when my family and I found ourselves swimming in fresh strawberries. We’d bought a massive box at the farmer’s market, and after a few days of eating them as-is, I decided to turn them into something a little more fun and fancy. Enter: mini cheesecakes. These little treats quickly became a summer favorite, and the combination of the sweet, tangy cream cheese with the fresh strawberry topping was a total game changer. Plus, they’re no-bake! Which, let’s be honest, is the ultimate gift when you’re trying to avoid turning on the oven in the middle of summer.
Whether you’re serving them at a summer picnic, a holiday gathering, or just because you want something to sweeten up your week, these Mini Strawberry Cheesecakes are a crowd-pleaser every single time. And honestly, the best part is that they look super impressive, but they’re so easy to make. It’s like you’re a baking rockstar without doing much work at all.
Why You’ll Love This Recipe
I’m all about recipes that are simple, but still deliver on flavor, and these Mini Strawberry Cheesecakes are no exception. Here’s why you’ll love them:
- No-Bake: No need to turn on the oven. This recipe is perfect for hot days when the last thing you want to do is heat up the kitchen.
- Fresh and Fruity: The strawberries add a pop of freshness, and the homemade strawberry topping is the perfect balance of sweet and tangy.
- Portion-Controlled: These cheesecakes are mini, so they’re perfectly portioned for each person. No fighting over the last slice!
- Super Easy: You don’t need any fancy equipment or complicated steps to pull this off. Just a few simple ingredients, and you’re good to go.
One bite of these little cheesecakes, and you’ll be hooked. The crust is buttery and crumbly, the cheesecake filling is smooth and creamy, and the strawberry topping adds that little bit of sweetness and tartness that ties everything together. I love how they can be dressed up for special occasions or served casually for an afternoon treat. They’re perfect for kids, adults, and everyone in between.
Preparation Time and Servings
- Total Time: 3 hours (30 minutes prep, 2.5 hours chilling)
- Servings: This recipe makes about 12 mini cheesecakes, depending on the size of your muffin tin.
Nutrition Facts (per serving):
- Calories: 280
- Protein: 4g
- Carbs: 28g
- Fat: 18g
Ingredients
For these delicious Mini Strawberry Cheesecakes, you’ll need the following ingredients:
Crust:
- 1 1/2 cups graham cracker crumbs: The base of our crust. Sweet and buttery—no cheesecake is complete without it.
- 1/4 cup sugar: Adds a bit of sweetness to balance the rich filling.
- 1/2 cup unsalted butter (melted): Helps hold the crumbs together, giving the crust its lovely texture.
Cheesecake Filling:
- 8 oz cream cheese (softened): This is what gives the cheesecake its classic rich, tangy flavor.
- 1/2 cup powdered sugar: Sweetens the cheesecake filling to perfection.
- 1 tsp vanilla extract: Adds depth and a warm, fragrant note.
- 1 cup heavy whipping cream: Helps make the filling smooth and light, creating that melt-in-your-mouth texture.
Strawberry Topping:
- 1 cup fresh strawberries (hulled and chopped): These will be the star of the show, adding that bright, fruity flavor.
- 2 tbsp sugar: To sweeten the strawberries and make a syrupy topping.
- 1 tbsp lemon juice: Enhances the strawberries’ flavor and adds a little tang.
Step-by-Step Instructions
1st step: Prepare the Crust
- Crush the graham crackers: If you’re using whole graham crackers, place them in a zip-top bag and crush them with a rolling pin, or pulse them in a food processor until fine crumbs form. You should have about 1 1/2 cups of crumbs.
- Mix the crumbs: In a medium bowl, combine the graham cracker crumbs, sugar, and melted butter. Stir well until everything is evenly coated, and the mixture feels like wet sand.
- Press the crust into the pans: Lightly grease a 12-cup muffin tin or a mini cheesecake pan. Divide the crumb mixture evenly between the muffin cups (about 1-2 tablespoons per cup) and press it down firmly with the back of a spoon or your fingers. You want a compact, solid crust, so press down well!
- Chill the crust: Place the muffin tin in the fridge for about 15-20 minutes to help the crust set.
2nd step: Prepare the Cheesecake Filling
- Beat the cream cheese: In a large bowl, beat the softened cream cheese with a hand mixer or stand mixer until it’s smooth and creamy. Make sure to scrape down the sides of the bowl as you go.
- Add the sugar and vanilla: Mix in the powdered sugar and vanilla extract. Beat until everything is fully combined, and the mixture is smooth and fluffy.
- Whip the cream: In a separate bowl, beat the heavy whipping cream until stiff peaks form. Be careful not to overwhip, or it might turn into butter!
- Combine the two mixtures: Gently fold the whipped cream into the cream cheese mixture, being careful not to deflate the whipped cream. The mixture should be light and fluffy.
3rd step: Assemble the Cheesecakes
- Fill the cups: Spoon the cheesecake filling onto the chilled graham cracker crusts. Use about 2-3 tablespoons of filling per cup. Smooth out the tops with a spatula or the back of a spoon to make them even.
- Chill the cheesecakes: Place the filled muffin tin back in the fridge and let the mini cheesecakes chill for at least 2-3 hours, or until they’re firm. They need time to set so they’ll hold their shape when you remove them from the tin.
4th step: Prepare the Strawberry Topping
- Cook the strawberries: In a small saucepan, combine the chopped strawberries, sugar, and lemon juice. Cook over medium heat for about 5-7 minutes, until the strawberries break down and the mixture becomes syrupy.
- Cool the topping: Let the strawberry topping cool to room temperature before spooning it over the cheesecakes. This will help the topping set nicely and prevent it from melting the cheesecake.
5th step: Assemble and Serve
- Top the cheesecakes: Once the cheesecakes have fully chilled and are firm, spoon a generous amount of the strawberry topping onto each one.
- Serve and enjoy: Serve immediately or keep them in the fridge until ready to serve. They’re perfect for any occasion!
How to Serve
These Mini Strawberry Cheesecakes are perfect on their own, but if you want to take them to the next level, here are some ideas:
- Serve with a dollop of whipped cream for added creaminess.
- Pair with a side of fresh fruit, like more sliced strawberries, raspberries, or blueberries, to complement the flavors.
- Serve on a platter at your next party or get-together. They’re the perfect mini dessert to impress your guests.
Additional Tips
- Make sure the cream cheese is softened: This will help it mix smoothly and prevent lumps in your cheesecake filling. Leave it out for at least 30 minutes before mixing.
- Don’t skip the chilling time: Letting the cheesecakes chill long enough ensures they set properly. I know it’s tempting, but patience is key!
- Customize the topping: While strawberries are the classic choice, feel free to use other fruits like blueberries, raspberries, or even a mixed berry compote for variety.
- Adjust the sweetness: If you like your cheesecakes a little sweeter, add more sugar to the filling or the strawberry topping. Taste as you go, and adjust it to your liking.
- Use a muffin tin liner: If you want to make removal extra easy, line your muffin tin with paper liners before adding the crust. That way, you can just peel them away when ready to serve.
Recipe Variations
- Chocolate-Covered Strawberry Cheesecakes: Drizzle some melted chocolate over the strawberry topping for a decadent twist.
- Lemon Cheesecake Base: Add a bit of lemon zest to the cheesecake filling for a citrusy kick that pairs perfectly with the strawberry topping.
- No-Sugar-Added Option: Swap out the sugar in the cheesecake filling and strawberry topping for a no-sugar-added alternative, like Stevia or Monk Fruit.
- Gluten-Free Crust: If you’re looking to make these gluten-free, simply substitute the graham crackers with gluten-free graham crackers or crushed gluten-free cookies.
Frequently Asked Questions (FAQ)
1. Can I make these mini cheesecakes in advance?
Absolutely! These mini cheesecakes are perfect for making ahead. You can prepare them up to 2-3 days in advance, and they’ll hold up beautifully in the fridge. Just store them in an airtight container, and add the strawberry topping right before serving.
2. Can I use frozen strawberries instead of fresh?
Yes, you can use frozen strawberries in the topping. Just make sure to thaw and drain them first to avoid excess moisture. Then, cook them down with sugar and lemon juice as the recipe suggests. The texture may be slightly different, but the flavor will still be delicious!
3. How do I make these gluten-free?
To make these mini cheesecakes gluten-free, simply swap out the graham cracker crumbs for gluten-free graham crackers or crushed gluten-free cookies. Everything else in the recipe remains the same.
4. Can I use a store-bought cheesecake crust?
While homemade crusts add a special touch, you can absolutely use a store-bought graham cracker crust if you’re short on time. Just make sure it’s finely crushed and evenly pressed into the muffin tin for best results.
5. Can I freeze the mini cheesecakes?
Yes! You can freeze the cheesecakes without the strawberry topping. Once fully chilled and set, place them in an airtight container and freeze for up to 3 months. To serve, thaw in the fridge for a few hours and add the strawberry topping just before serving.
Print
Mini Strawberry Cheesecakes
- Total Time: 3 hours
Ingredients
For the Crust:
- 1 1/2 cups graham cracker crumbs: The base of our crust. Sweet and buttery—no cheesecake is complete without it.
- 1/4 cup sugar: Adds a bit of sweetness to balance the rich filling.
- 1/2 cup unsalted butter (melted): Helps hold the crumbs together, giving the crust its lovely texture.
For the Cheesecake Filling:
- 8 oz cream cheese (softened): This is what gives the cheesecake its classic rich, tangy flavor.
- 1/2 cup powdered sugar: Sweetens the cheesecake filling to perfection.
- 1 tsp vanilla extract: Adds depth and a warm, fragrant note.
- 1 cup heavy whipping cream: Helps make the filling smooth and light, creating that melt-in-your-mouth texture.
For the Strawberry Topping:
- 1 cup fresh strawberries (hulled and chopped): These will be the star of the show, adding that bright, fruity flavor.
- 2 tbsp sugar: To sweeten the strawberries and make a syrupy topping.
- 1 tbsp lemon juice: Enhances the strawberries’ flavor and adds a little tang.
Instructions
Step 1: Prepare the Crust
- Crush the graham crackers: If you’re using whole graham crackers, place them in a zip-top bag and crush them with a rolling pin, or pulse them in a food processor until fine crumbs form. You should have about 1 1/2 cups of crumbs.
- Mix the crumbs: In a medium bowl, combine the graham cracker crumbs, sugar, and melted butter. Stir well until everything is evenly coated, and the mixture feels like wet sand.
- Press the crust into the pans: Lightly grease a 12-cup muffin tin or a mini cheesecake pan. Divide the crumb mixture evenly between the muffin cups (about 1-2 tablespoons per cup) and press it down firmly with the back of a spoon or your fingers. You want a compact, solid crust, so press down well!
- Chill the crust: Place the muffin tin in the fridge for about 15-20 minutes to help the crust set.
Step 2: Prepare the Cheesecake Filling
- Beat the cream cheese: In a large bowl, beat the softened cream cheese with a hand mixer or stand mixer until it’s smooth and creamy. Make sure to scrape down the sides of the bowl as you go.
- Add the sugar and vanilla: Mix in the powdered sugar and vanilla extract. Beat until everything is fully combined, and the mixture is smooth and fluffy.
- Whip the cream: In a separate bowl, beat the heavy whipping cream until stiff peaks form. Be careful not to overwhip, or it might turn into butter!
- Combine the two mixtures: Gently fold the whipped cream into the cream cheese mixture, being careful not to deflate the whipped cream. The mixture should be light and fluffy.
Step 3: Assemble the Cheesecakes
- Fill the cups: Spoon the cheesecake filling onto the chilled graham cracker crusts. Use about 2-3 tablespoons of filling per cup. Smooth out the tops with a spatula or the back of a spoon to make them even.
- Chill the cheesecakes: Place the filled muffin tin back in the fridge and let the mini cheesecakes chill for at least 2-3 hours, or until they’re firm. They need time to set so they’ll hold their shape when you remove them from the tin.
Step 4: Prepare the Strawberry Topping
- Cook the strawberries: In a small saucepan, combine the chopped strawberries, sugar, and lemon juice. Cook over medium heat for about 5-7 minutes, until the strawberries break down and the mixture becomes syrupy.
- Cool the topping: Let the strawberry topping cool to room temperature before spooning it over the cheesecakes. This will help the topping set nicely and prevent it from melting the cheesecake.
Step 5: Assemble and Serve
- Top the cheesecakes: Once the cheesecakes have fully chilled and are firm, spoon a generous amount of the strawberry topping onto each one.
- Serve and enjoy: Serve immediately or keep them in the fridge until ready to serve. They’re perfect for any occasion!
- Prep Time: 30 minutes
Nutrition
- Calories: 280
- Fat: 18g
- Carbohydrates: 28g
- Protein: 4g
Conclusion
These Mini Strawberry Cheesecakes are the perfect dessert for any occasion, whether it’s a summer BBQ, a holiday party, or just a sweet treat for yourself. The creamy cheesecake filling pairs perfectly with the sweet strawberry topping, and the graham cracker crust adds a delicious crunch.
What’s even better is that these little cheesecakes can be made ahead of time, which makes them the ideal make-ahead dessert for busy days. Plus, with no baking involved, they’re great for warmer months when you want something refreshing and light.
I hope you enjoy making and eating these mini cheesecakes as much as I do. They’re a fun, easy, and delicious way to satisfy your sweet tooth, and I guarantee they’ll be a hit with everyone who tries them. So go ahead, treat yourself (and your loved ones) to these perfect little bites of cheesecake goodness!


