Introduction
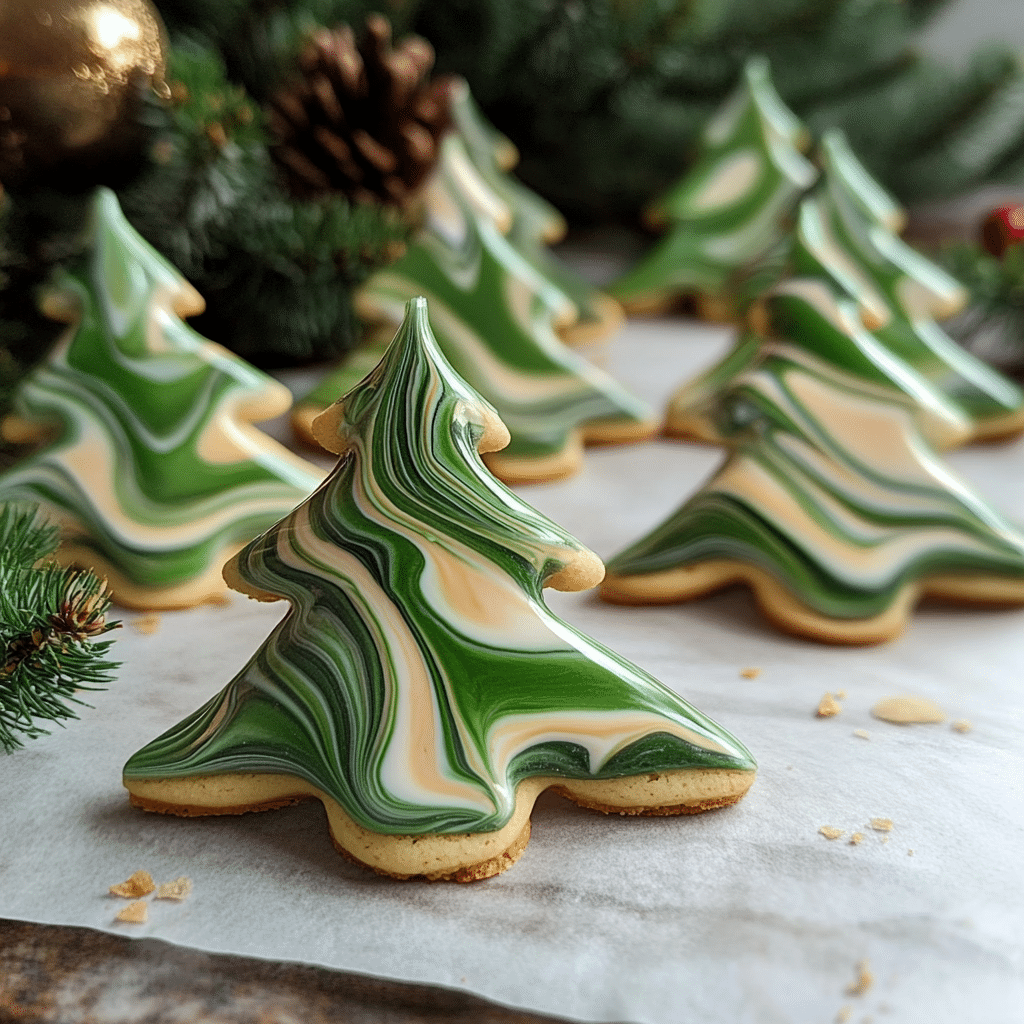
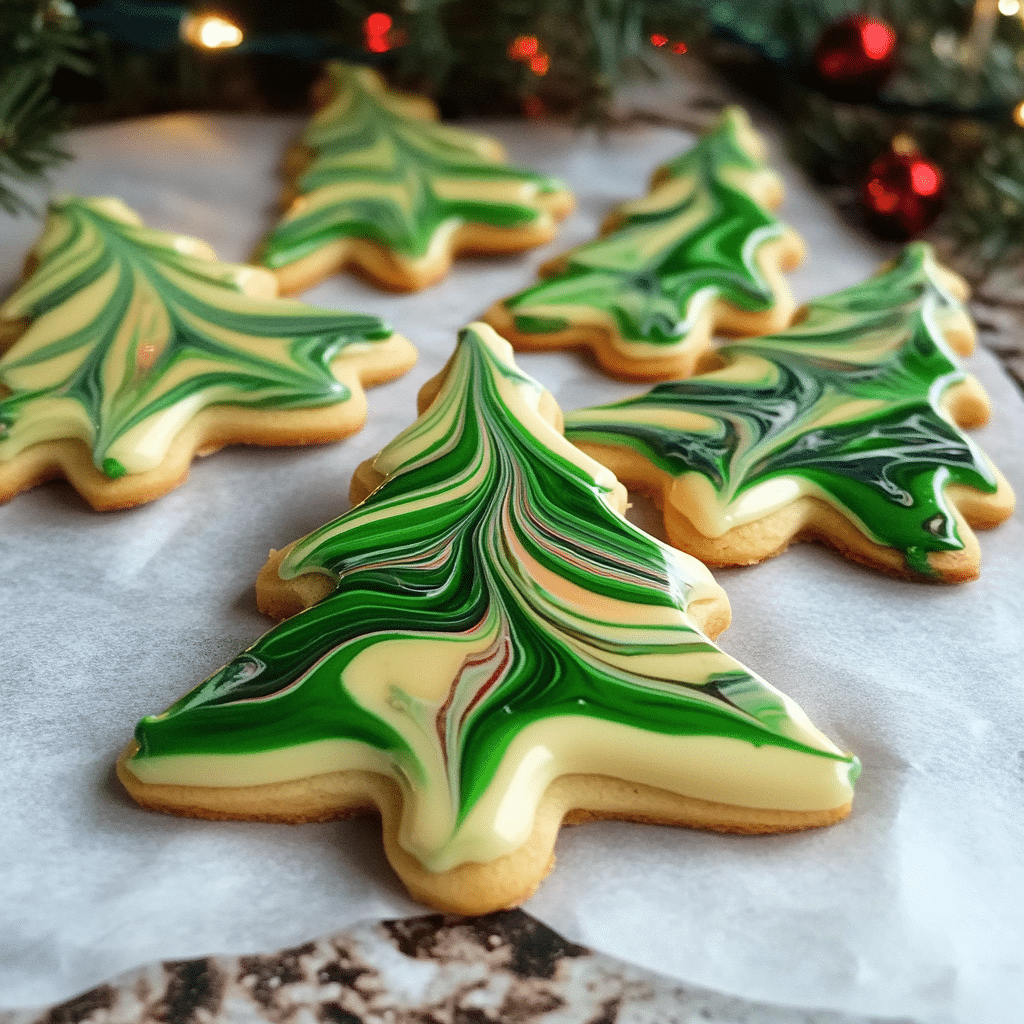
The holiday season is full of cozy moments—sipping on hot cocoa, wrapping gifts, and, of course, baking festive treats. These Mini Marbled Christmas Tree Cookies are a perfect way to bring some extra holiday cheer to your kitchen. Not only are they adorable, but they’re also surprisingly simple to make and bursting with festive flavor. Imagine taking a bite and tasting the buttery sweetness of the sugar cookie with a subtle almond flavor, all wrapped up in a beautiful marbled design that screams Christmas.
I first made these cookies a few years ago when I was in charge of bringing dessert to a family holiday party. I wanted something festive but easy to make—something that would get everyone talking and bring a little extra magic to the dessert table. After a few batches, I ended up with the perfect recipe. The best part? The marbled effect looks complicated, but it’s actually a breeze to create, and I promise, even beginner bakers can nail it.
Now, every Christmas, these cookies are a staple in my house. They’re not only fun to make but also great for gift-giving or decorating your holiday dessert table. Plus, they’re mini, which means you can eat a few without feeling too guilty! Whether you’re baking with kids or simply enjoying some time in the kitchen alone, these cookies are the perfect way to spread the joy of the season.
Why You’ll Love This Recipe
If you’re on the fence about making these Mini Marbled Christmas Tree Cookies, here are a few reasons why you’ll want to add them to your holiday baking list:
- Easy to Make: These cookies come together in no time. The dough is simple, and the marbled effect is so much easier than it looks. No need for advanced techniques—just a little bit of patience and a fun swirl of colors!
- Festive & Fun: These cookies scream Christmas, and they’re sure to get compliments. They’re the perfect combination of adorable and delicious—ideal for holiday parties or cookie swaps.
- Customizable: You can switch up the colors to match any holiday theme, and the size makes them perfect for little hands or for packing into cute gift boxes.
- Butter & Almond Flavor: The dough is soft and buttery, with a hint of almond extract. It’s the perfect balance of sweet and rich, making these cookies a crowd-pleaser.
The best part? Once you make them, you’ll quickly realize that these Mini Marbled Christmas Tree Cookies are the kind of recipe that brings everyone together—whether you’re baking with your little ones, hosting a cookie exchange, or simply spreading a little holiday cheer with a plate of homemade treats.
Preparation Time and Servings
- Total Time: 2 hours (1 hour prep, 1 hour chilling, 15 minutes baking)
- Servings: This recipe makes about 24 mini cookies, perfect for sharing at a holiday party or giving as a gift.
Nutrition Facts (per serving):
- Calories: 120
- Protein: 1g
- Carbs: 18g
- Fat: 5g
Ingredients
Here’s everything you’ll need to make these delicious Mini Marbled Christmas Tree Cookies:
- 1 3/4 cups all-purpose flour: The base of your cookie dough, providing structure and a soft texture.
- 1/2 teaspoon baking powder: Helps the dough rise slightly for that perfect chewy texture.
- 1/4 teaspoon salt: Balances out the sweetness and enhances the flavors.
- 1/2 cup unsalted butter (softened): This gives your cookies that rich, buttery flavor.
- 1 cup granulated sugar: For sweetness and structure.
- 1 large egg: Binds the dough together and adds richness.
- 1 teaspoon vanilla extract: Adds warmth and depth to the flavor.
- 1/2 teaspoon almond extract: Gives the cookies that classic almond flavor that pairs beautifully with the buttery dough.
- Food coloring: Red and green (or any colors you prefer) for the marbling effect.
- Sprinkles (optional): For decoration and extra festive flair.
Tip: Be sure to use unsalted butter so you can control the salt content, and opt for gel food coloring rather than liquid food coloring for more vibrant, marbled results.
Step-by-Step Instructions
Now for the fun part—let’s make these Mini Marbled Christmas Tree Cookies!
- Prepare Your Ingredients:
Start by gathering all your ingredients. Measure out the flour, baking powder, and salt, and set them aside. You’ll want everything ready to go before you start mixing! - Cream Butter and Sugar:
In a large mixing bowl, cream together the softened butter and granulated sugar until light and fluffy. This will take about 3-4 minutes with an electric mixer, or a little longer if you’re doing it by hand. The goal is to get the butter and sugar to a creamy consistency, which helps the cookies turn out tender. - Add the Wet Ingredients:
Once the butter and sugar are creamed, add in the egg, vanilla extract, and almond extract. Beat the mixture until everything is well combined. You should have a smooth, slightly airy batter. - Mix Dry Ingredients:
In a separate bowl, whisk together the all-purpose flour, baking powder, and salt. Gradually add the dry ingredients to the wet ingredients, mixing until just combined. Be careful not to overwork the dough—overmixing can result in tougher cookies. - Divide the Dough:
Now comes the fun part—dividing the dough into sections. Depending on how many colors you want, divide the dough into 3 or 4 portions. For this recipe, I recommend dividing it into 3 portions for a classic red, green, and white marbled effect. - Color the Dough:
Add a few drops of food coloring to each portion of dough. Start with a small amount of food coloring and mix it in with your hands or a spatula. Add more until you achieve the desired intensity of color. Don’t worry if the colors aren’t perfectly even—it adds to the marbled effect! - Chill the Dough:
Wrap each colored portion of dough in plastic wrap and chill in the fridge for about 30 minutes to an hour. This makes the dough easier to work with when you roll it out. - Roll and Shape the Dough:
Once chilled, it’s time to roll out the dough! On a lightly floured surface, roll each dough color into small, bite-sized balls (about the size of a marble). Then, flatten each ball slightly with your hands or a rolling pin. - Marble the Dough:
Take a small piece of each color of dough and stack them on top of each other. Gently roll them together into a log, then twist it a few times to create the marbled effect. Don’t overdo it—you want to keep the swirls visible, not blend the colors together too much. - Cut Into Trees:
Using a small Christmas tree-shaped cookie cutter, cut out mini Christmas tree shapes from the marbled dough. If you don’t have a tree-shaped cutter, you can use any fun holiday shapes you have on hand. - Bake the Cookies:
Preheat your oven to 350°F (175°C). Line a baking sheet with parchment paper and place the cookies on the sheet, about 1 inch apart. Bake for 10-12 minutes, or until the edges are slightly golden. Keep an eye on them as they bake—these cookies are small, so they cook quickly. - Cool and Decorate:
Allow the cookies to cool on the baking sheet for a few minutes before transferring them to a wire rack to cool completely. Once cooled, you can decorate them with festive sprinkles or even add tiny edible decorations like little sugar pearls to make them extra special.
How to Serve
These Mini Marbled Christmas Tree Cookies are perfect for serving at any holiday gathering. Here are some fun ideas:
- Holiday Cookie Tray: Arrange them alongside other Christmas cookies like sugar cookies, gingerbread, and snickerdoodles for a festive cookie platter.
- Gift Boxes: Package them up in cute holiday tins or clear treat bags to give as gifts to family, friends, or teachers.
- Cookie Decorating: If you’re hosting a holiday cookie-decorating party, these cookies are a great starting point. Let the kids or guests add their own icing and sprinkles to make each cookie unique.
Additional Tips
- Chill the Dough: Make sure to chill your dough before rolling it out. This makes it easier to work with and helps the cookies maintain their shape as they bake.
- Use Gel Food Coloring: Gel food coloring works best for vibrant, marbled cookies. Liquid food coloring can sometimes make the dough too wet.
- Don’t Overmix: When creating the marbled effect, be gentle. Overmixing will turn your dough a solid color and will lose the marbled look.
- Customize Your Sprinkles: Feel free to get creative with the decorations! Use colored sugar, sprinkles, or edible glitter to add an extra touch of holiday magic.
FAQ: Mini Marbled Christmas Tree Cookies
1. Can I use different cookie cutters for these cookies?
Absolutely! While I love the classic Christmas tree shape, feel free to use any holiday-themed cookie cutters you have on hand. Stars, snowflakes, or even gingerbread men work wonderfully. Just be sure to adjust the baking time slightly for larger or smaller cookie shapes.
2. Can I make the dough ahead of time?
Yes, you can! If you want to save time, you can prepare the dough a day or two in advance. Simply wrap each colored dough portion in plastic wrap and store them in the fridge. When you’re ready to bake, let the dough sit at room temperature for a few minutes before rolling it out.
3. Can I freeze these cookies?
Yes! These cookies freeze beautifully. After baking and cooling the cookies, layer them in an airtight container, separating each layer with parchment paper to prevent sticking. Freeze for up to 3 months. When you’re ready to enjoy them, let them thaw at room temperature for a few hours.
4. How can I make the marbling more vibrant?
To achieve the brightest marbled effect, use gel food coloring instead of liquid food coloring. Gel food coloring is thicker and won’t affect the dough’s consistency. You can also add more food coloring to get a deeper shade, but be careful not to overdo it—just a few drops will do!
5. What’s the best way to decorate these cookies?
Once the cookies are cooled, you can add sprinkles, colored sugar, or edible glitter for extra sparkle. For a more detailed decoration, use royal icing or melted chocolate to pipe on designs like stars or mini ornaments. If you’re feeling creative, add small candy decorations like mini M&Ms for a fun twist.
Print
Mini Marbled Christmas Tree Cookies
- Total Time: 2 hours
Ingredients
Here’s everything you’ll need to make these delicious Mini Marbled Christmas Tree Cookies:
- 1 3/4 cups all-purpose flour: The base of your cookie dough, providing structure and a soft texture.
- 1/2 teaspoon baking powder: Helps the dough rise slightly for that perfect chewy texture.
- 1/4 teaspoon salt: Balances out the sweetness and enhances the flavors.
- 1/2 cup unsalted butter (softened): This gives your cookies that rich, buttery flavor.
- 1 cup granulated sugar: For sweetness and structure.
- 1 large egg: Binds the dough together and adds richness.
- 1 teaspoon vanilla extract: Adds warmth and depth to the flavor.
- 1/2 teaspoon almond extract: Gives the cookies that classic almond flavor that pairs beautifully with the buttery dough.
- Food coloring: Red and green (or any colors you prefer) for the marbling effect.
- Sprinkles (optional): For decoration and extra festive flair.
Instructions
- Prepare Your Ingredients:
Start by gathering all your ingredients. Measure out the flour, baking powder, and salt, and set them aside. You’ll want everything ready to go before you start mixing! - Cream Butter and Sugar:
In a large mixing bowl, cream together the softened butter and granulated sugar until light and fluffy. This will take about 3-4 minutes with an electric mixer, or a little longer if you’re doing it by hand. The goal is to get the butter and sugar to a creamy consistency, which helps the cookies turn out tender. - Add the Wet Ingredients:
Once the butter and sugar are creamed, add in the egg, vanilla extract, and almond extract. Beat the mixture until everything is well combined. You should have a smooth, slightly airy batter. - Mix Dry Ingredients:
In a separate bowl, whisk together the all-purpose flour, baking powder, and salt. Gradually add the dry ingredients to the wet ingredients, mixing until just combined. Be careful not to overwork the dough—overmixing can result in tougher cookies. - Divide the Dough:
Now comes the fun part—dividing the dough into sections. Depending on how many colors you want, divide the dough into 3 or 4 portions. For this recipe, I recommend dividing it into 3 portions for a classic red, green, and white marbled effect. - Color the Dough:
Add a few drops of food coloring to each portion of dough. Start with a small amount of food coloring and mix it in with your hands or a spatula. Add more until you achieve the desired intensity of color. Don’t worry if the colors aren’t perfectly even—it adds to the marbled effect! - Chill the Dough:
Wrap each colored portion of dough in plastic wrap and chill in the fridge for about 30 minutes to an hour. This makes the dough easier to work with when you roll it out. - Roll and Shape the Dough:
Once chilled, it’s time to roll out the dough! On a lightly floured surface, roll each dough color into small, bite-sized balls (about the size of a marble). Then, flatten each ball slightly with your hands or a rolling pin. - Marble the Dough:
Take a small piece of each color of dough and stack them on top of each other. Gently roll them together into a log, then twist it a few times to create the marbled effect. Don’t overdo it—you want to keep the swirls visible, not blend the colors together too much. - Cut Into Trees:
Using a small Christmas tree-shaped cookie cutter, cut out mini Christmas tree shapes from the marbled dough. If you don’t have a tree-shaped cutter, you can use any fun holiday shapes you have on hand. - Bake the Cookies:
Preheat your oven to 350°F (175°C). Line a baking sheet with parchment paper and place the cookies on the sheet, about 1 inch apart. Bake for 10-12 minutes, or until the edges are slightly golden. Keep an eye on them as they bake—these cookies are small, so they cook quickly. - Cool and Decorate:
Allow the cookies to cool on the baking sheet for a few minutes before transferring them to a wire rack to cool completely. Once cooled, you can decorate them with festive sprinkles or even add tiny edible decorations like little sugar pearls to make them extra special.
Nutrition
- Serving Size: 24
- Calories: 120
- Fat: 5g
- Carbohydrates: 18g
- Protein: 1g
Conclusion
There’s something truly special about baking during the holiday season. The aroma of freshly baked cookies, the joy of decorating with loved ones, and the excitement of sharing homemade treats with friends and family are memories that last a lifetime. These Mini Marbled Christmas Tree Cookies are a fun, easy, and festive way to add some extra cheer to your celebrations. Whether you’re baking alone with some Christmas music playing or involving the kids in the kitchen, this recipe brings the magic of the season right to your oven.
So, grab your cookie cutters, your favorite holiday sprinkles, and let’s get baking! These cookies aren’t just delicious—they’re a beautiful addition to any holiday spread. Perfect for cookie swaps, family gatherings, or just because you want to spread a little Christmas cheer. Enjoy each bite, knowing you’ve created something truly festive from scratch.
Happy baking and happy holidays!

