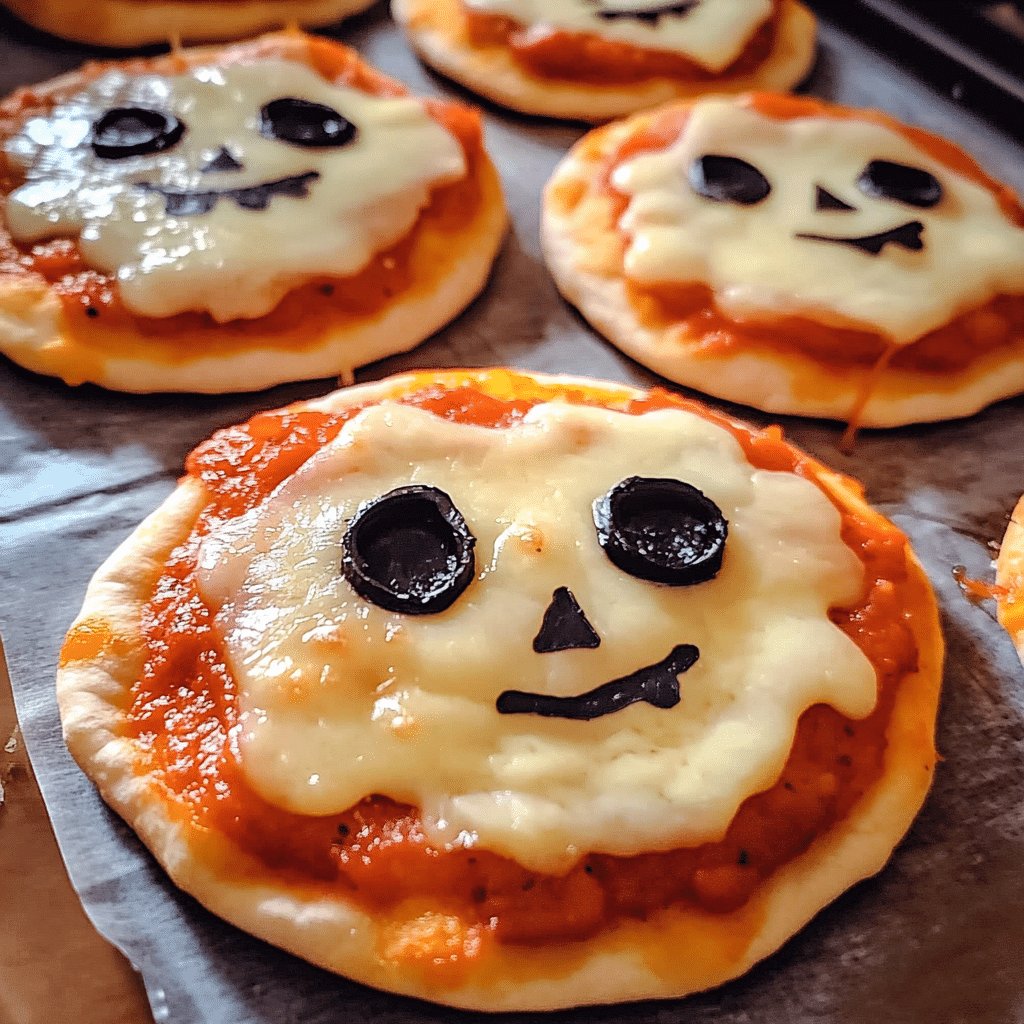
Mini Halloween Pizzas are the perfect spooky treat for a fun and festive Halloween party or family dinner. These adorable, bite-sized pizzas are easy to make, customizable, and a hit with both kids and adults alike. Whether you want to create little pizza mummies, spider web designs, or jack-o’-lantern faces, these mini pizzas bring creativity and flavor together in the best way possible. Plus, they’re ready in no time, so you can spend more time enjoying the holiday fun. The best part? You can get the whole family involved in decorating these spooky pizzas—everyone can design their own creepy creation!
The first time I made these mini Halloween pizzas was for a neighborhood Halloween party, and they were an absolute hit! I had set up a little pizza decorating station with toppings and different pizza “faces,” and both kids and adults loved making their own spooky designs. It was the perfect way to get everyone into the Halloween spirit while enjoying a delicious, customizable meal. Now, we make these pizzas every year as a pre-trick-or-treating dinner tradition. They’re fun, easy, and super festive—perfect for celebrating the season!
Why You’ll Love This Recipe:
- Fun and festive: These mini pizzas are shaped and decorated to fit the Halloween theme, making them perfect for parties or family gatherings.
- Easy to make: You can use store-bought pizza dough or even pre-made crusts to cut down on prep time, making this a quick and easy recipe.
- Customizable: Whether you like pepperoni, veggies, or cheese, these pizzas can be topped with all your favorite ingredients. You can also adjust the designs to fit your spooky style!
- Kid-friendly: This is a great recipe to get kids involved in the kitchen. Let them create their own Halloween-themed pizzas with their favorite toppings.
- Perfect for a crowd: These mini pizzas are great for serving a group—everyone can choose their favorite toppings and design their own creepy creation!
Total Time: 25 minutes
Servings: 8 mini pizzas
Calories per serving: 200
Protein: 10g, Carbs: 25g, Fat: 7g
Ingredients:
- 1 package store-bought pizza dough (or use pre-made mini pizza crusts)
- 1 cup pizza sauce
- 1 ½ cups shredded mozzarella cheese
- 16 slices pepperoni
- ½ cup sliced black olives
- ½ cup green bell pepper, thinly sliced
- 8 string cheese sticks (for mummy design)
- 1 small zucchini, thinly sliced (for eyes or jack-o’-lantern faces)
- ½ teaspoon Italian seasoning
- Olive oil for brushing
- Optional: candy eyes (for decorating)
Instructions:
- Preheat the oven: Preheat your oven to 425°F (220°C). If you’re using store-bought pizza dough, roll it out on a floured surface to about ¼-inch thickness. Use a round cookie cutter or the rim of a glass to cut out 8 small circles of dough for your mini pizzas. If using pre-made mini pizza crusts, set them aside for topping.
- Prepare the dough: Place the pizza dough rounds on a baking sheet lined with parchment paper. Lightly brush each piece of dough with olive oil to help them brown nicely in the oven. Sprinkle a pinch of Italian seasoning over each dough round for extra flavor.
- Add the sauce: Spoon about 1 tablespoon of pizza sauce onto each mini pizza crust, spreading it out evenly. Be sure to leave a little space around the edges for the crust.
- Get creative with your toppings: Now comes the fun part! You can design each pizza with different spooky faces or Halloween designs:
- Mummy Pizzas: Lay strips of string cheese across the pizza in a criss-cross pattern to create a “mummy” look. Add black olive slices or candy eyes for the mummy’s eyes.
- Jack-o’-Lantern Pizzas: Use thin slices of pepperoni or zucchini to create pumpkin faces. Make triangles for eyes and a jagged smile to give your pizza a jack-o’-lantern look.
- Spider Web Pizzas: Add shredded mozzarella cheese in a circular pattern to resemble a web, then use thin slices of black olives to create a spider shape in the middle.
- Add extra cheese and toppings: After decorating, sprinkle more mozzarella cheese on top to cover any extra sauce. You can also add any additional toppings, like green bell pepper slices for “stems” on jack-o’-lanterns or more black olives for eyes on mummies.
- Bake the pizzas: Place the mini pizzas in the preheated oven and bake for about 10-12 minutes, or until the crust is golden brown and the cheese is melted and bubbly. Keep an eye on them to make sure they don’t overcook.
- Serve and enjoy: Remove the mini Halloween pizzas from the oven and let them cool for a few minutes before serving. You can add candy eyes for extra decoration or keep them as they are. Serve with extra pizza sauce for dipping if desired.
How to Serve:
- For a party: Arrange the mini Halloween pizzas on a large serving platter and let your guests choose their favorite designs. You can even set up a DIY pizza station so everyone can make their own spooky creation!
- For family dinner: Serve these mini pizzas with a side of fresh veggies or a salad for a well-rounded meal. They’re perfect as a fun pre-trick-or-treating dinner.
- As an appetizer: These pizzas also make great appetizers for Halloween parties or gatherings. Serve them alongside other Halloween-themed snacks for a complete spread.
Additional Tips:
- Use pre-made crusts for convenience: If you’re short on time, you can use pre-made mini pizza crusts or even English muffins as the base for these pizzas. This cuts down on prep time and makes the recipe even quicker.
- Make ahead: You can prepare the mini pizzas in advance and store them in the fridge until you’re ready to bake. Just assemble the pizzas with sauce and toppings, cover with plastic wrap, and refrigerate for up to 4 hours before baking.
- Switch up the toppings: Don’t be afraid to get creative with the toppings! You can use different vegetables, meats, or cheeses to make your spooky pizza designs. For example, use sliced mushrooms as “spider bodies” or thinly sliced peppers to create ghost shapes.
- Make it gluten-free: To make these mini Halloween pizzas gluten-free, use a gluten-free pizza dough or pre-made gluten-free crusts. Many stores now carry gluten-free pizza crusts that work perfectly for this recipe.
Recipe Variations:
- Spooky Ghost Pizzas: Use a ghost-shaped cookie cutter to cut out the dough, then top with white cheese to create ghostly mini pizzas. Add black olive slices for eyes.
- Veggie Monster Pizzas: Load your mini pizzas with vegetables like bell peppers, onions, and olives to create “monster faces.” Use slices of zucchini or cucumber for the eyes, and shredded carrots or spinach for hair.
- Pepperoni Spiders: Cut pepperoni slices into spider shapes and place them on top of the cheese. Use thin strips of pepperoni for the legs to create a creepy crawly pizza topping.
- Mini Vampire Pizzas: Use black olives for eyes and thin slices of pepperoni or bell peppers to create “fangs” on your vampire pizzas.
Serving Suggestions:
- With dipping sauces: Serve your mini Halloween pizzas with different dipping sauces like ranch, marinara, or garlic butter for extra flavor.
- With Halloween snacks: Pair these pizzas with other Halloween-themed treats like “witch finger” breadsticks, pumpkin-shaped cheese balls, or spooky fruit platters for a full party spread.
- With a salad: For a balanced meal, serve the mini pizzas alongside a fresh green salad with a light vinaigrette.
Freezing and Storage:
- Storing leftovers: If you have any leftover mini pizzas, store them in an airtight container in the fridge for up to 3 days. Reheat in the oven at 350°F for 5-7 minutes or until warmed through.
- Freezing: You can freeze the unbaked mini pizzas for later. Assemble the pizzas with sauce and toppings, then place them on a baking sheet to freeze until solid. Once frozen, transfer to a freezer-safe bag and store for up to 2 months. When ready to bake, pop them in the oven straight from the freezer—just add a couple of extra minutes to the baking time.
Special Equipment:
- Round cookie cutter or glass: To cut out the mini pizza dough rounds, use a round cookie cutter or the rim of a drinking glass.
- Baking sheet: A regular baking sheet lined with parchment paper is perfect for baking these mini pizzas.
- Small spatula: A small spatula will help you easily transfer the mini pizzas from the baking sheet to your serving platter.
FAQ:
- Can I use whole wheat pizza dough? Yes! Whole wheat pizza dough works great and adds a little extra fiber to the mini pizzas. You can also use gluten-free dough if needed.
- What can I use if I don’t have a cookie cutter? If you don’t have a round cookie cutter, you can use the rim of a glass or even cut the dough into squares for a different shape.
- Can I make these in an air fryer? Absolutely! You can cook the mini pizzas in an air fryer at 400°F for about 6-8 minutes, depending on the size of your air fryer and pizzas.
- What if I don’t have pizza sauce? No problem! You can use marinara sauce, tomato sauce, or even a homemade sauce by combining tomato paste, garlic, and Italian seasoning.
- How do I keep the pizzas from getting soggy? Brushing the dough with olive oil before adding sauce helps prevent sogginess. Also, be sure not to overload the pizzas with sauce or toppings.
Conclusion:
These Mini Halloween Pizzas are not only delicious but also so much fun to make and decorate. They’re the perfect way to celebrate Halloween with a festive twist on a classic dish, and they’re sure to be a hit at any party or family gathering. Whether you’re making pizza mummies, jack-o’-lantern faces, or spooky spider webs, the possibilities are endless! Be sure to tag me on Instagram when you create your own Halloween mini pizzas—I’d love to see your spooky designs! Happy Halloween and happy baking!
Print
Mini Halloween Pizzas
- Total Time: 35 minutes
Description
As Halloween approaches, I find myself in the kitchen more than usual, whipping up festive treats that not only taste great but also spark joy and excitement in my family. This year, I decided to try something new: Mini Halloween Pizzas! Let me tell you, they were a massive hit! Each little pizza became a canvas for creativity, and my family had so much fun decorating them. From the giggles while spreading the sauce to the delightful chaos of adding toppings, it felt more like a fun family activity than just cooking. My kids loved every bite and were so proud of their spooky creations. If you’re looking for a fun, easy, and delicious way to celebrate Halloween, these mini pizzas are your answer!
Ingredients
Gather your ingredients and get ready for a spooktacular time! Here’s what you’ll need for these mini Halloween pizzas:
- Pizza Dough: You can use store-bought or make your own from scratch (which I highly recommend if you have the time!).
- Pizza Sauce: 1 cup (store-bought or homemade).
- Shredded Mozzarella Cheese: 2 cups.
- Sliced Olives: For spooky eyes.
- Pepperoni: Cut into fun shapes with cookie cutters (pumpkins, bats, or ghosts!).
- Bell Peppers: Sliced into strips for some vibrant colors.
- Fresh Basil or Spinach: For a touch of green (and added nutrition!).
- Cornmeal: For dusting the baking sheet (optional).
- Olive Oil: For brushing.
Instructions
Now that you have everything ready, let’s get into the fun part—making these mini Halloween pizzas!
- Preheat Your Oven: Preheat your oven to 425°F (220°C). This is the perfect temperature for getting that golden crust!
- Prepare the Dough: If you’re using store-bought pizza dough, roll it out on a floured surface. If you’re feeling adventurous, you can make your own dough (just follow your favorite recipe!). Aim for small, individual-sized circles (about 4 inches in diameter). You can use a cookie cutter or a glass to help with this.
- Add Sauce and Cheese: Place the mini pizza bases on a baking sheet lined with parchment paper (or dusted with cornmeal). Spread a generous tablespoon of pizza sauce on each base, leaving a little edge for the crust. Sprinkle a handful of shredded mozzarella on top.
- Get Creative with Toppings: This is where the fun really begins! Use sliced olives for eyes, and add your pepperoni shapes, bell pepper strips, and any other toppings to create spooky faces or Halloween scenes.
- Bake: Brush the edges of the crust lightly with olive oil for that beautiful golden color. Bake in the preheated oven for about 12-15 minutes, or until the cheese is melted and bubbly, and the crust is golden brown.
- Cool and Serve: Let them cool for a couple of minutes before serving. They’re perfect for little hands (and big ones, too!).
- Prep Time: 20 minutes
- Cook Time: 15 minutes
Nutrition
- Serving Size: 8
- Calories: 250

