Introduction
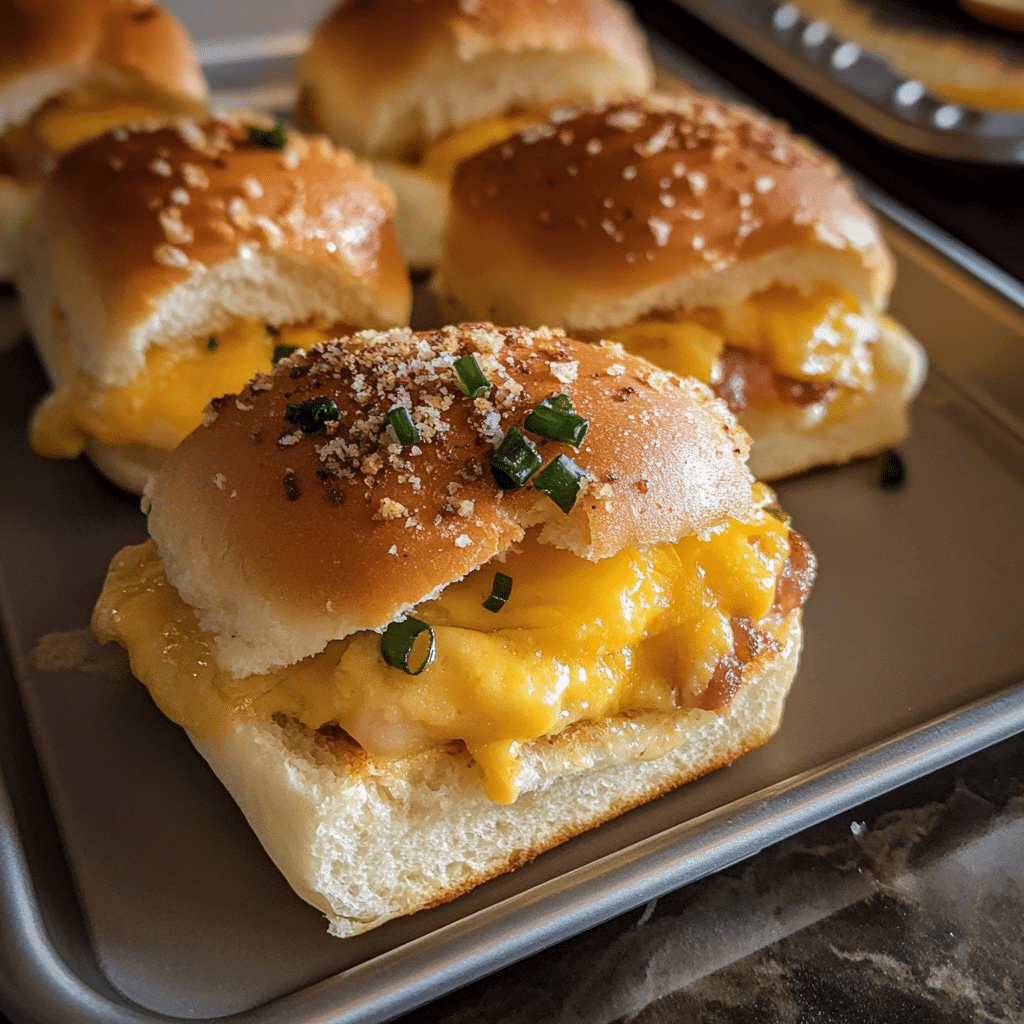
There’s something about breakfast sliders that feels like a delightful treat, especially when they’re made with sweet Hawaiian rolls! These sliders are not just breakfast; they’re a game-changer, perfect for everything from lazy Sunday mornings to brunch gatherings and holiday get-togethers. Imagine biting into a soft, buttery roll filled with savory eggs, crispy bacon, and gooey cheese—pure bliss!
I first stumbled upon this recipe during a brunch at a friend’s house. She had a platter of these sliders sitting on the table, and I couldn’t resist trying one (or three!). Each bite was a perfect balance of sweet and savory, with just the right amount of crunch from the bacon. I remember thinking, “Why haven’t I made these before?” Since then, they’ve become a staple in my breakfast repertoire, and I love making them for friends and family.
What I adore about Hawaiian Roll Breakfast Sliders is how incredibly easy they are to whip up. You don’t need to be a master chef to impress your guests! Plus, they’re incredibly versatile—feel free to switch out the ingredients based on your preferences or what you have on hand. Whether you’re a meat lover, a vegetarian, or somewhere in between, these sliders can accommodate everyone. So, let’s dive into this deliciously simple recipe that’s sure to become a favorite in your home!
Why You’ll Love This Recipe
These Hawaiian Roll Breakfast Sliders are an absolute must-try for several reasons:
- Easy to Make: With just a handful of ingredients and minimal prep time, these sliders are a breeze to put together. Perfect for beginners or anyone looking for a quick breakfast solution!
- Family-Friendly: These sliders are a hit with both kids and adults. Their sweet flavor from the Hawaiian rolls and savory fillings make them irresistible to everyone at the breakfast table.
- Rich in Flavor: The combination of fluffy eggs, crispy bacon, and melty cheese nestled in soft Hawaiian rolls is heavenly. The rolls add a touch of sweetness that complements the savory ingredients perfectly.
- Customizable: You can easily swap out ingredients to suit your taste. Want to make them vegetarian? Just replace the bacon with sautéed veggies! Looking for a bit of spice? Add some jalapeños or hot sauce.
- Great for Meal Prep: These sliders can be made ahead of time and stored in the fridge or freezer, making them an ideal meal prep option for busy mornings.
Each slider is a delicious little bundle of joy that’ll brighten up your breakfast routine. Plus, they look adorable on a platter, making them perfect for any gathering!
Preparation Time and Servings
- Total Time: 30 minutes
- Preparation Time: 10 minutes
- Cooking Time: 20 minutes
- Servings: This recipe makes 12 sliders, perfect for feeding a crowd or enjoying leftovers throughout the week!
- Nutrition Facts: Calories per serving: 300, Protein: 14g, Carbs: 30g, Fat: 16g.
Ingredients
Here’s what you’ll need to make these delicious Hawaiian Roll Breakfast Sliders:
- 12 Hawaiian rolls (the star of the show, soft and sweet!)
- 6 large eggs (for fluffy, protein-packed goodness)
- 6 slices of bacon (or turkey bacon for a lighter option)
- 1 cup shredded cheese (cheddar or a cheese blend works wonderfully)
- 2 tablespoons milk (to make the eggs extra creamy)
- Salt and pepper (to taste)
- 2 tablespoons butter (for greasing the baking dish and adding flavor)
- Optional toppings: fresh herbs like chives or parsley for garnish, or a drizzle of hot sauce for some kick!
Each ingredient plays a crucial role in creating a mouthwatering breakfast slider. The Hawaiian rolls add a delightful sweetness, while the eggs provide a creamy texture. The crispy bacon adds that essential crunch, and the cheese melts beautifully, tying everything together. Trust me, you’ll want to keep these ingredients on hand for your next brunch!
Step-by-Step Instructions
Let’s break down the cooking process into clear, easy-to-follow steps. You’ll be enjoying your sliders in no time!
1st step: Preheat Your Oven
First things first—preheat your oven to 350°F (175°C). This will ensure your sliders bake evenly and get that lovely golden color.
2nd step: Prepare the Baking Dish
While your oven is heating up, grab a 9×13-inch baking dish. Grease it lightly with butter to prevent the sliders from sticking. This step is crucial for easy cleanup later!
3rd step: Cook the beef
- Cook the beef: In a skillet over medium heat, cook the bacon until it’s crispy. This usually takes about 5-7 minutes, depending on your stove. Once done, transfer the bacon to a paper towel-lined plate to drain any excess grease. Allow it to cool for a minute, then crumble or chop it into bite-sized pieces.
- Tip: If you’re using turkey bacon, the cooking time might be slightly less, so keep an eye on it!
4th step: Whisk the Eggs
- In a mixing bowl, crack the six eggs and add the milk, salt, and pepper. Whisk them together until fully combined and frothy. The milk helps to create a creamy texture that makes the eggs even more delicious.
5th step: Scramble the Eggs
- Cook the eggs: In the same skillet used for the bacon (no need to clean it!), pour in the egg mixture. Cook over medium-low heat, stirring gently with a spatula until the eggs are just set but still slightly soft. This usually takes about 4-5 minutes.
- Note: Don’t overcook the eggs; they’ll continue to cook a bit after being removed from the heat.
6th step: Assemble the Sliders
- Slice the rolls: Using a serrated knife, carefully slice the Hawaiian rolls in half horizontally, keeping them attached at the back. This makes for easy assembly.
- Layer the ingredients: Place the bottom halves of the rolls in the greased baking dish. Then, layer the scrambled eggs evenly over the rolls. Sprinkle the crumbled bacon on top of the eggs, followed by the shredded cheese. Finally, place the top halves of the rolls on the sliders.
7th step: Add Butter
- In a small bowl, melt the 2 tablespoons of butter. Once melted, brush the tops of the rolls with the butter for an extra touch of flavor and a beautiful golden finish.
8th step: Bake
- Bake the sliders: Pop the baking dish in the preheated oven and bake for 15-20 minutes, or until the cheese is melted and bubbly, and the tops of the rolls are lightly golden.
- Tip: If you want an extra crispy top, you can broil them for the last 2 minutes, but keep a close eye on them to prevent burning!
9th step: Serve
- Once they’re done baking, remove the sliders from the oven and let them cool for a few minutes. Then, cut them into individual sliders and serve warm.
- Optional: Garnish with fresh herbs or a drizzle of hot sauce if you like a bit of spice!
How to Serve
These Hawaiian Roll Breakfast Sliders are best enjoyed warm, right out of the oven. Here are some serving suggestions to elevate your breakfast experience:
- Accompaniments: Serve with fresh fruit on the side, like sliced strawberries or a tropical fruit salad, to balance the richness of the sliders.
- Beverage Pairing: A glass of freshly squeezed orange juice or a cup of hot coffee pairs beautifully with these sliders, making for a classic breakfast combo.
- For Kids: Serve them with a side of maple syrup for dipping; it adds a fun twist that kids will love!
These sliders are not only delicious but also visually appealing, making them perfect for brunch gatherings or even a special family breakfast.
Additional Tips
To ensure your Hawaiian Roll Breakfast Sliders turn out perfectly every time, here are some handy tips:
- Use Fresh Ingredients: Fresh eggs and high-quality bacon or turkey bacon will make a noticeable difference in flavor. If possible, opt for local or organic ingredients.
- Don’t Overcook the Eggs: Remember, the eggs will continue to cook a bit after you remove them from the heat. Aim for slightly undercooked eggs for the best texture in your sliders.
- Customize to Your Taste: Feel free to experiment with different cheeses (like pepper jack for a spicy kick) or add in extras like sautéed peppers, onions, or spinach for added flavor and nutrition.
- Keep It Simple: If you’re short on time, you can prep the egg mixture the night before and store it in the fridge. Just cook the bacon and assemble the sliders in the morning for a quick breakfast.
- Make Ahead: These sliders can be made ahead of time and reheated in the oven. Just assemble them, cover them with foil, and refrigerate until ready to bake. Perfect for busy mornings!
Recipe Variations
One of the best things about these Hawaiian Roll Breakfast Sliders is how customizable they are. Here are some fun variations to try:
- Veggie Delight: Replace the bacon with sautéed vegetables like bell peppers, onions, and mushrooms. Add in some feta or goat cheese for a delicious vegetarian option.
- Southwest Style: Mix in some diced jalapeños and black beans into the egg mixture for a spicy twist. Top with pepper jack cheese and serve with avocado slices on the side.
- Mediterranean Twist: Add chopped spinach, sun-dried tomatoes, and feta cheese to the egg mixture. These sliders will have a delightful Mediterranean flavor!
- Cheesy Ham: Swap out the bacon for diced ham and use a blend of cheeses, such as cheddar and Swiss, for a hearty option.
- Sweet and Savory: Drizzle some maple syrup over the assembled sliders before baking for a sweet touch that complements the savory ingredients perfectly.
Frequently Asked Questions (FAQ)
1. Can I make these sliders ahead of time?
Yes! You can assemble the sliders the night before and refrigerate them. In the morning, just pop them in the oven for baking. This makes for an easy and quick breakfast solution!
2. Can I freeze the sliders?
Absolutely! Once baked and cooled, you can freeze the sliders in an airtight container or freezer bag. To reheat, simply thaw them in the refrigerator overnight and warm them up in the oven at 350°F (175°C) until heated through.
3. What can I substitute for the bacon?
If you want a vegetarian option, you can substitute the bacon with sautéed vegetables like spinach, bell peppers, or mushrooms. You can also use turkey bacon or ham for a different protein option.
4. Can I use different types of cheese?
Definitely! Feel free to experiment with different cheeses based on your preference. Cheddar, pepper jack, Swiss, or even a cheese blend can work beautifully in these sliders.
5. How do I store leftovers?
Store any leftover sliders in an airtight container in the refrigerator for up to 3-4 days. Reheat in the oven or microwave before serving.
6. Can I add other toppings?
Absolutely! You can add toppings such as sliced avocado, fresh herbs, or even a drizzle of hot sauce for a kick. Get creative and customize them to your liking!
7. What’s the best way to reheat these sliders?
The best way to reheat them is in the oven. Preheat your oven to 350°F (175°C) and place the sliders on a baking sheet. Cover with foil to retain moisture and heat for about 10-15 minutes, or until warmed through.
Print
Hawaiian Roll Breakfast Sliders
- Total Time: 30 minutes
Ingredients
Here’s what you’ll need to make these delicious Hawaiian Roll Breakfast Sliders:
- 12 Hawaiian rolls (the star of the show, soft and sweet!)
- 6 large eggs (for fluffy, protein-packed goodness)
- 6 slices of bacon (or turkey bacon for a lighter option)
- 1 cup shredded cheese (cheddar or a cheese blend works wonderfully)
- 2 tablespoons milk (to make the eggs extra creamy)
- Salt and pepper (to taste)
- 2 tablespoons butter (for greasing the baking dish and adding flavor)
- Optional toppings: fresh herbs like chives or parsley for garnish, or a drizzle of hot sauce for some kick!
Instructions
Let’s break down the cooking process into clear, easy-to-follow steps. You’ll be enjoying your sliders in no time!
Step 1: Preheat Your Oven
First things first—preheat your oven to 350°F (175°C). This will ensure your sliders bake evenly and get that lovely golden color.
Step 2: Prepare the Baking Dish
While your oven is heating up, grab a 9×13-inch baking dish. Grease it lightly with butter to prevent the sliders from sticking. This step is crucial for easy cleanup later!
Step 3: Cook the Bacon
- Cook the bacon: In a skillet over medium heat, cook the bacon until it’s crispy. This usually takes about 5-7 minutes, depending on your stove. Once done, transfer the bacon to a paper towel-lined plate to drain any excess grease. Allow it to cool for a minute, then crumble or chop it into bite-sized pieces.
- Tip: If you’re using turkey bacon, the cooking time might be slightly less, so keep an eye on it!
Step 4: Whisk the Eggs
- In a mixing bowl, crack the six eggs and add the milk, salt, and pepper. Whisk them together until fully combined and frothy. The milk helps to create a creamy texture that makes the eggs even more delicious.
Step 5: Scramble the Eggs
- Cook the eggs: In the same skillet used for the bacon (no need to clean it!), pour in the egg mixture. Cook over medium-low heat, stirring gently with a spatula until the eggs are just set but still slightly soft. This usually takes about 4-5 minutes.
- Note: Don’t overcook the eggs; they’ll continue to cook a bit after being removed from the heat.
Step 6: Assemble the Sliders
- Slice the rolls: Using a serrated knife, carefully slice the Hawaiian rolls in half horizontally, keeping them attached at the back. This makes for easy assembly.
- Layer the ingredients: Place the bottom halves of the rolls in the greased baking dish. Then, layer the scrambled eggs evenly over the rolls. Sprinkle the crumbled bacon on top of the eggs, followed by the shredded cheese. Finally, place the top halves of the rolls on the sliders.
Step 7: Add Butter
- In a small bowl, melt the 2 tablespoons of butter. Once melted, brush the tops of the rolls with the butter for an extra touch of flavor and a beautiful golden finish.
Step 8: Bake
- Bake the sliders: Pop the baking dish in the preheated oven and bake for 15-20 minutes, or until the cheese is melted and bubbly, and the tops of the rolls are lightly golden.
- Tip: If you want an extra crispy top, you can broil them for the last 2 minutes, but keep a close eye on them to prevent burning!
Step 9: Serve
- Once they’re done baking, remove the sliders from the oven and let them cool for a few minutes. Then, cut them into individual sliders and serve warm.
- Optional: Garnish with fresh herbs or a drizzle of hot sauce if you like a bit of spice!
- Prep Time: 10 minutes
- Cook Time: 20 minutes
Nutrition
- Serving Size: 12
- Calories: 300
- Fat: 16g
- Carbohydrates: 30g
- Protein: 14g
Conclusion
Hawaiian Roll Breakfast Sliders are a delightful addition to any breakfast or brunch menu. They’re easy to make, full of flavor, and guaranteed to impress your family and friends. With their fluffy texture, sweet and savory combinations, and endless customization options, you’ll find yourself making these sliders again and again.
Whether you’re serving them for a special occasion or simply enjoying a cozy morning at home, these sliders are sure to bring a smile to your face. Don’t forget to save this recipe for those busy mornings or brunch gatherings—you’ll be the hero of breakfast!
So, what are you waiting for? Grab those Hawaiian rolls, whip up some delicious fillings, and enjoy the magic of these breakfast sliders. And remember, the best meals are the ones shared with loved ones, so gather around the table and savor every bite together!

