Introduction
There’s something about Thanksgiving that brings back the warmest memories, and no dish does that quite like my grandma’s stuffing. Every year, we’d gather around the table, and while the turkey was always the centerpiece, it was her stuffing that we all craved. It wasn’t just food; it was a connection to our family’s past, a dish steeped in tradition and love. The smell of sautéed onions and celery filling the kitchen, the crispy edges with a soft, savory center, and that perfect mix of herbs—it was, and still is, pure holiday magic.
Grandma’s stuffing wasn’t complicated, but it was special. The recipe has been passed down through the generations, and while I’ve added a few tweaks here and there, I still try to keep it as close to hers as possible. I love making it because it feels like she’s right there with me, guiding my hands as I prepare it. If you’re looking for a stuffing recipe that’s full of flavor, family history, and comfort, this is it. Plus, it’s super simple to pull together—even for a busy holiday meal.
Why You’ll Love This Recipe
Here are some reasons why this stuffing will become a must-have on your Thanksgiving menu:
- It’s Easy to Make: The ingredients are simple and likely already in your pantry. You won’t need any fancy equipment or complicated techniques.
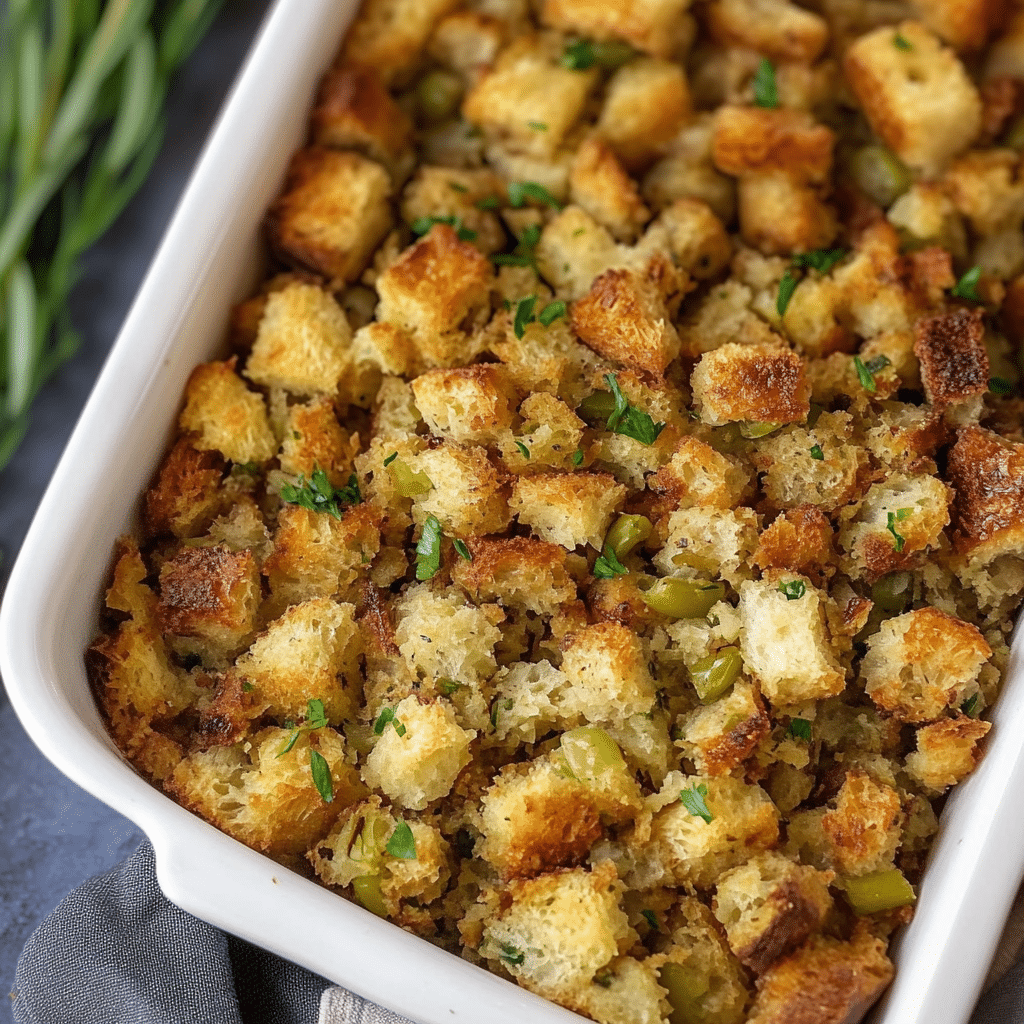
- Perfect Texture: You get a wonderful balance of crispy, golden-brown edges with a soft, flavorful inside. Every bite is a little different, but always delicious.
- Full of Flavor: The combination of sautéed vegetables, herbs like sage and thyme, and just the right amount of broth makes this stuffing rich and savory without being overpowering.
- Customizable: Want to add your own spin? It’s easy to adapt—add mushrooms for an earthy touch or cranberries for a sweet contrast.
- A Family Favorite: This stuffing has been loved by generations in my family, and I’m sure it will be a hit in yours too.
Preparation Time and Servings
- Total Time: 1 hour 15 minutes
- Prep Time: 20 minutes
- Cook Time: 55 minutes
- Servings: 8-10 servings
Ingredients
Here’s everything you’ll need to make Grandma’s classic Thanksgiving stuffing:
- 1 loaf of day-old bread (about 10 cups, cubed)
- The bread forms the base of the stuffing. Using day-old or slightly stale bread is essential because it soaks up the broth without becoming mushy.
- 1 large onion, diced
- Adds a savory flavor and a bit of sweetness when cooked.
- 3-4 stalks celery, diced
- Brings crunch and freshness to the stuffing.
- 2 cloves garlic, minced
- A little garlic goes a long way in adding depth.
- 1/2 cup butter
- Helps create a rich, flavorful base for sautéing the vegetables.
- 2 teaspoons dried sage
- Sage is the classic herb in stuffing, adding that distinctive earthy flavor.
- 1 teaspoon dried thyme
- Complements the sage and adds another layer of herbiness.
- Salt and pepper, to taste
- Don’t skimp on seasoning—taste as you go.
- 2-3 cups chicken or vegetable broth
- The broth moistens the bread and carries the flavor of the herbs and vegetables.
- 2 large eggs, beaten
- The eggs help bind the stuffing and give it structure.
- Optional: 1/2 cup cooked sausage or turkey bacon, crumbled
- For extra heartiness and a bit of meaty flavor.
Step-by-Step Instructions
Preheat the Oven
Preheat your oven to 350°F (175°C). While the oven heats, you can get started on preparing your stuffing.
Cube the Bread
If your bread isn’t already cubed, go ahead and cut it into bite-sized pieces (about 1-inch cubes). Spread the cubed bread onto a large baking sheet and let it sit out for a few hours to dry. If you don’t have time, toast the cubes in the oven at 350°F for 10-15 minutes until slightly crisp.
Sauté the Vegetables
In a large skillet over medium heat, melt the butter. Once melted, add the diced onions and celery, sautéing for about 8-10 minutes until softened and fragrant. Add the minced garlic and cook for an additional minute, just until fragrant.
Season the Veggies
Sprinkle the sage and thyme over the vegetables, stirring to coat everything in the herbs. Season with a pinch of salt and pepper. Cook for another 1-2 minutes to allow the herbs to bloom and release their flavors into the butter and vegetables.
Combine the Bread and Veggies
In a large mixing bowl, combine the cubed bread and the sautéed vegetables. Toss everything together gently, making sure the bread gets an even coating of the butter and herb mixture.
Add the Broth
Slowly pour in 2 cups of the broth, tossing the bread cubes as you go. You want the bread to absorb the liquid but not become too soggy. If the mixture still looks dry, add more broth, a little at a time, until the bread is moist but not soaked through.
Add the Eggs
Beat the eggs in a small bowl, then drizzle them over the bread mixture. Stir gently to combine. The eggs will help bind the stuffing, giving it that classic fluffy yet firm texture.
Optional: Add Sausage or beef
If you’re using cooked sausage or turkey beef, crumble it into the bread mixture and stir until evenly distributed. This adds a savory depth and makes the stuffing heartier.
Transfer to a Baking Dish
Grease a 9×13-inch baking dish and spread the stuffing mixture evenly into the dish. Press it down gently, but don’t pack it in too tightly—this ensures it stays light and fluffy as it bakes.
Bake the Stuffing
Cover the baking dish with foil and bake for 30 minutes. After 30 minutes, remove the foil and bake for another 20-25 minutes, or until the top is golden brown and crispy. The edges should be slightly crunchy, while the center remains soft and moist.
Let it Rest
Once out of the oven, let the stuffing rest for 5-10 minutes before serving. This helps the flavors meld and makes it easier to slice or scoop.
How to Serve
There are so many ways to serve this stuffing alongside your Thanksgiving feast. Here are a few ideas:
- Classic Thanksgiving Dinner: Serve this stuffing alongside roasted turkey, mashed potatoes, and gravy.
- As a Main Dish: If you want to make it heartier, add more sausage or turkey bacon and serve it as the star of a meal with a side of roasted vegetables.
- Leftover Sandwiches: The next day, use the stuffing in sandwiches with leftover turkey and cranberry sauce. Trust me, it’s the ultimate Thanksgiving sandwich!
Additional Tips
- Toast the Bread: If you don’t have day-old bread, you can dry it out by toasting it in the oven at a low temperature (about 250°F) for 15-20 minutes.
- Adjust the Broth: If you like a drier stuffing, use less broth. For a more moist stuffing, add a bit more.
- Don’t Overmix: Stir gently to keep the bread cubes intact. Overmixing can make the stuffing too dense.
- For Crispier Stuffing: If you love extra crispy stuffing, spread it out in a thin layer on a baking sheet instead of a deep baking dish.
- Vegetarian Option: Use vegetable broth instead of chicken broth, and skip the sausage or bacon for a completely meat-free stuffing.
Recipe Variations
- Sausage and Apple Stuffing: Add diced apples and cooked sausage for a sweet and savory twist.
- Cranberry Pecan Stuffing: Fold in dried cranberries and toasted pecans for a little extra texture and flavor.
- Gluten-Free: Use gluten-free bread or cornbread to make this recipe gluten-free without sacrificing taste or texture.
- Herb Varieties: Experiment with different herbs like rosemary, parsley, or even a little marjoram for a unique flavor profile.
Freezing and Storage
- Storage: Leftover stuffing can be stored in an airtight container in the fridge for up to 3 days.
- Freezing: You can freeze cooked stuffing for up to 3 months. To reheat, thaw it overnight in the fridge, then warm it in the oven at 350°F for 15-20 minutes.
- Reheating: For the best results, reheat the stuffing in the oven so it stays crispy on top. If you’re in a hurry, the microwave works too, but the texture will be softer.
FAQ (Frequently Asked Questions)
1. Can I make this stuffing ahead of time?
Yes, you can! You can assemble the stuffing a day before and refrigerate it unbaked. On Thanksgiving Day, simply bake it as directed. This way, you can reduce your workload while still enjoying freshly baked stuffing.
2. What kind of bread is best for stuffing?
Any sturdy, slightly stale bread works well for stuffing. I like using French bread, sourdough, or even a combination of different types. Avoid soft sandwich bread, as it can get too mushy.
3. How do I prevent my stuffing from being too soggy?
The key to preventing soggy stuffing is to add the broth gradually. Make sure the bread is moist but not drenched. If you prefer a drier stuffing, reduce the amount of broth.
4. Can I use store-bought bread cubes?
Yes, you can! Store-bought bread cubes are convenient and can save time. Just make sure to use unseasoned ones so you can control the flavor of the stuffing.
5. Can I make this recipe vegetarian?
Absolutely. Use vegetable broth instead of chicken broth, and omit the sausage or bacon. You can even add in extra veggies like mushrooms or bell peppers for added flavor.
Print
Grandma’s Thanksgiving Stuffing
- Total Time: 1 hour
Ingredients
Here’s everything you’ll need to make Grandma’s classic Thanksgiving stuffing:
- 1 loaf of day-old bread (about 10 cups, cubed)
- The bread forms the base of the stuffing. Using day-old or slightly stale bread is essential because it soaks up the broth without becoming mushy.
- 1 large onion, diced
- Adds a savory flavor and a bit of sweetness when cooked.
- 3-4 stalks celery, diced
- Brings crunch and freshness to the stuffing.
- 2 cloves garlic, minced
- A little garlic goes a long way in adding depth.
- 1/2 cup butter
- Helps create a rich, flavorful base for sautéing the vegetables.
- 2 teaspoons dried sage
- Sage is the classic herb in stuffing, adding that distinctive earthy flavor.
- 1 teaspoon dried thyme
- Complements the sage and adds another layer of herbiness.
- Salt and pepper, to taste
- Don’t skimp on seasoning—taste as you go.
- 2-3 cups chicken or vegetable broth
- The broth moistens the bread and carries the flavor of the herbs and vegetables.
- 2 large eggs, beaten
- The eggs help bind the stuffing and give it structure.
- Optional: 1/2 cup cooked sausage or turkey bacon, crumbled
- For extra heartiness and a bit of meaty flavor.
Instructions
- Preheat the Oven: Preheat your oven to 350°F (175°C). While the oven heats, you can get started on preparing your stuffing.
- Cube the Bread: If your bread isn’t already cubed, go ahead and cut it into bite-sized pieces (about 1-inch cubes). Spread the cubed bread onto a large baking sheet and let it sit out for a few hours to dry. If you don’t have time, toast the cubes in the oven at 350°F for 10-15 minutes until slightly crisp.
- Sauté the Vegetables: In a large skillet over medium heat, melt the butter. Once melted, add the diced onions and celery, sautéing for about 8-10 minutes until softened and fragrant. Add the minced garlic and cook for an additional minute, just until fragrant.
- Season the Veggies: Sprinkle the sage and thyme over the vegetables, stirring to coat everything in the herbs. Season with a pinch of salt and pepper. Cook for another 1-2 minutes to allow the herbs to bloom and release their flavors into the butter and vegetables.
- Combine the Bread and Veggies: In a large mixing bowl, combine the cubed bread and the sautéed vegetables. Toss everything together gently, making sure the bread gets an even coating of the butter and herb mixture.
- Add the Broth: Slowly pour in 2 cups of the broth, tossing the bread cubes as you go. You want the bread to absorb the liquid but not become too soggy. If the mixture still looks dry, add more broth, a little at a time, until the bread is moist but not soaked through.
- Add the Eggs: Beat the eggs in a small bowl, then drizzle them over the bread mixture. Stir gently to combine. The eggs will help bind the stuffing, giving it that classic fluffy yet firm texture.
- Optional: Add Sausage or Bacon: If you’re using cooked sausage or turkey bacon, crumble it into the bread mixture and stir until evenly distributed. This adds a savory depth and makes the stuffing heartier.
- Transfer to a Baking Dish: Grease a 9×13-inch baking dish and spread the stuffing mixture evenly into the dish. Press it down gently, but don’t pack it in too tightly—this ensures it stays light and fluffy as it bakes.
- Bake the Stuffing: Cover the baking dish with foil and bake for 30 minutes. After 30 minutes, remove the foil and bake for another 20-25 minutes, or until the top is golden brown and crispy. The edges should be slightly crunchy, while the center remains soft and moist.
- Let it Rest: Once out of the oven, let the stuffing rest for 5-10 minutes before serving. This helps the flavors meld and makes it easier to slice or scoop.
- Prep Time: 20 minutes
- Cook Time: 55 minutes
Nutrition
- Serving Size: 10
Conclusion
Grandma’s Thanksgiving stuffing is more than just a side dish; it’s a cherished tradition. Every bite brings back memories of family gatherings, laughter around the dinner table, and the comforting smell of Thanksgiving cooking. Whether you stick to the original recipe or add your own twist, this stuffing is sure to become a favorite at your holiday table.
It’s easy to make, full of flavor, and has the perfect balance of crispy and soft textures. This dish not only complements the Thanksgiving turkey but also stands out on its own as a warm, comforting classic. Try it this Thanksgiving and let it become part of your family’s holiday traditions, just as it has been in mine. Enjoy!

