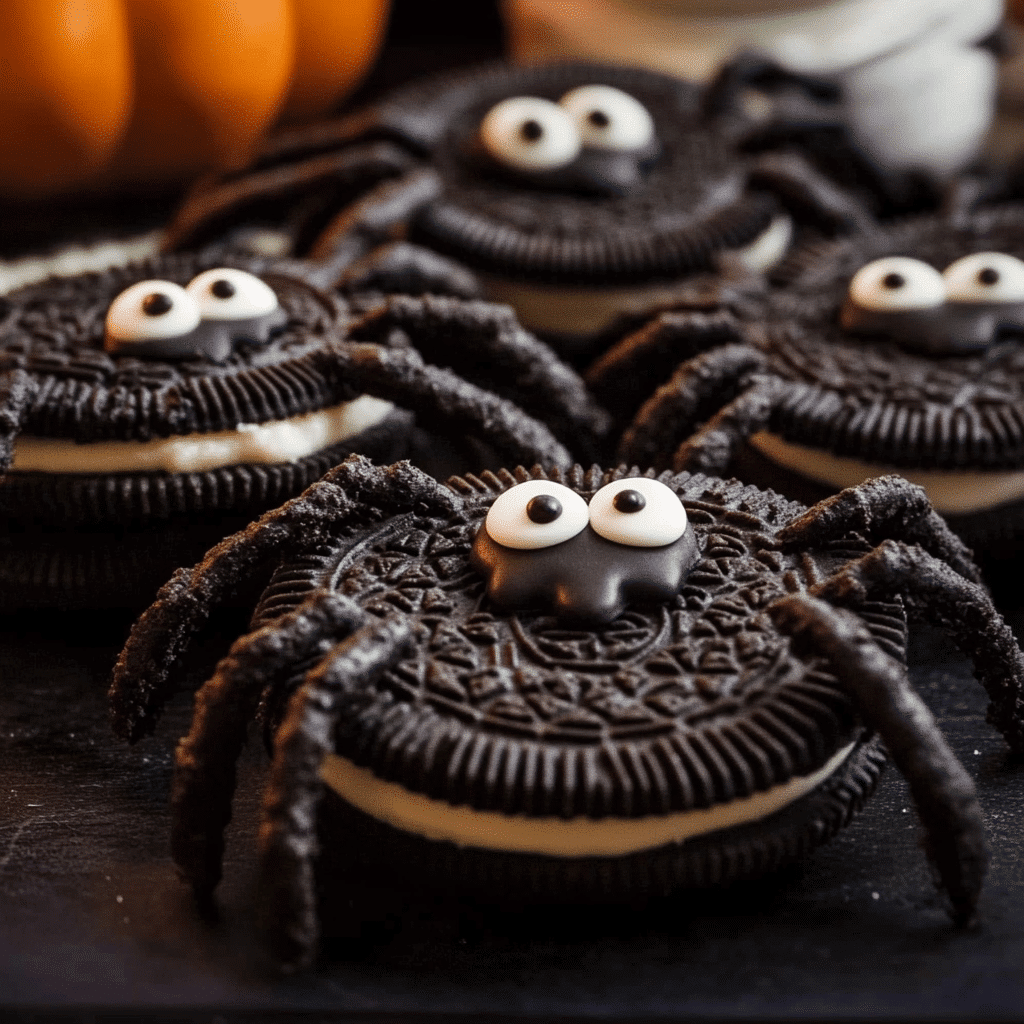
Halloween is one of the most fun times of the year for getting creative in the kitchen. Whether you’re hosting a spooky party, preparing treats for trick-or-treaters, or just looking to have some festive fun with your family, Halloween-themed snacks are always a hit. One of my favorite go-to treats for this spooky season is Easy Oreo Spiders. These adorable (and delicious!) cookie spiders are simple to make, don’t require any baking, and are a great activity to do with kids or friends. With just a few ingredients, you can turn regular Oreos into creepy-cute spider treats that will have everyone smiling—before devouring them!
I first discovered these Oreo Spiders when I was looking for a quick and easy Halloween snack idea that would be fun to make with my kids. It’s a no-bake treat that only takes a few minutes to assemble, and the results are always so cute. The best part? You don’t need to be a pro in the kitchen to pull them off! These spiders are fun, playful, and can be customized with different candy eyes, sprinkles, or even flavored Oreos. Whether you’re a beginner or an expert in the kitchen, these Halloween Oreo Spiders will be a hit at any gathering.
Why You’ll Love This Recipe:
- Super easy to make: No baking required! Just a few simple steps to assemble these adorable treats.
- Perfect for Halloween: These spider-themed snacks are spooky yet cute, making them perfect for a Halloween party or as a fun after-school treat.
- Fun for kids: This is a great recipe to involve the little ones—kids love assembling the spiders and adding their own creative touches.
- Customizable: You can use different kinds of Oreos, candy eyes, or even change the type of “legs” for endless variations.
- Quick to assemble: These Oreo spiders come together in under 15 minutes, making them ideal for last-minute party prep.
Preparation Time and Servings:
- Total time: 15 minutes
- Servings: 12 Oreo spiders
- Calories per serving: 180
- Protein: 1g, Carbs: 28g, Fat: 8g
Ingredients:
- 12 Oreo cookies (you can use classic, Double Stuf, or any flavor of your choice)
- 48 mini pretzel sticks (for spider legs)
- 24 candy eyes (you can find these at most grocery stores or online)
- 1/4 cup chocolate chips or candy melts (for glue)
- 1 tablespoon vegetable oil (optional, to thin the chocolate)
- Optional: black licorice or gummy candy for different legs, orange icing for extra decoration
Step-by-Step Instructions:
1. Prepare the chocolate glue:
Start by melting your chocolate chips or candy melts in a microwave-safe bowl. Microwave the chocolate in 20-30 second intervals, stirring in between, until fully melted and smooth. If the chocolate is too thick, you can add a tablespoon of vegetable oil to thin it out, making it easier to work with. This melted chocolate will act as the “glue” to attach the spider legs and eyes.
2. Add the spider legs:
Carefully twist apart each Oreo cookie, trying to keep the cream filling intact on one side. If the filling splits between the two cookie halves, just scrape some onto one half—it’ll act as a stabilizer for the spider legs. Take four pretzel sticks and gently press them into the cream filling on one side of the Oreo, positioning them as spider legs. Repeat on the other side so you have a total of eight pretzel legs (four on each side). If the pretzel sticks don’t hold in place, you can use a little melted chocolate to help secure them.
3. Reassemble the Oreos:
Once the legs are attached, place a small dab of melted chocolate in the center of the Oreo filling, then gently press the other half of the cookie back on top, sandwiching the legs in place. Be careful not to press too hard, as you don’t want to break the cookie or displace the legs.
4. Attach the candy eyes:
Using a toothpick or the tip of a spoon, dab a small amount of melted chocolate onto the back of each candy eye. Place two eyes on top of the Oreo, right near the edge of the cookie, so they look like a spider’s face. Press the eyes gently to make sure they stick. If you prefer a different look, you can also use mini chocolate chips, M&Ms, or icing to create your spider’s eyes.
5. Let the spiders set:
Once the spiders are assembled, set them aside on a parchment-lined baking sheet to allow the chocolate to harden. This should take about 10-15 minutes at room temperature. If you’re in a hurry, you can pop the Oreo spiders into the fridge for a few minutes to speed up the process.
6. Optional decorations:
For an extra festive touch, you can drizzle the spiders with orange or purple icing, add sprinkles, or even create tiny fangs or webs with icing. If you’re making these for a party, having a decorating station where guests can customize their own Oreo spiders is a fun idea!
How to Serve:
- Halloween party platter: Arrange the Oreo spiders on a spooky Halloween-themed platter surrounded by candy corn, gummy worms, or other Halloween treats. They make a perfect centerpiece for a party dessert table.
- Snack time fun: These spiders make a great snack to serve at home during October. Pair them with apple slices or a glass of milk for a festive treat.
- School treats: If your child’s school allows homemade treats, these Oreo spiders are a fun and easy snack to send with them for a Halloween celebration. Just be sure to pack them carefully so the pretzel legs don’t break!
Additional Tips:
- Use different types of Oreos: While classic Oreos work great, feel free to experiment with other flavors. Golden Oreos, Halloween-themed Oreos (with orange filling), or even Double Stuf Oreos add a fun twist to the look and taste of the spiders.
- Alternate spider legs: Don’t limit yourself to pretzel sticks—black licorice, gummy strings, or thin chocolate-covered pretzels can also make great spider legs. Black licorice gives the spiders a creepier look, while pretzels offer a salty contrast to the sweet Oreo.
- Make ahead of time: You can assemble these Oreo spiders up to two days in advance. Store them in an airtight container at room temperature until you’re ready to serve them. Just be careful with the spider legs, as they can be a bit fragile.
- Vary the eyes: Candy eyes are the easiest option, but you can also use mini chocolate chips, M&Ms, or even frosting to make the eyes. For a more whimsical look, add more than two eyes—some spiders have as many as eight eyes!
- Kid-friendly decorating: Set up a “build your own spider” station for kids to create their own creepy-crawly creations. Have a variety of toppings and decorations available so they can customize their spiders however they like.
Recipe Variations:
- Spooky Oreo Bats: Swap out the pretzel legs for mini Oreo wings! Break mini Oreos in half and use melted chocolate to attach them to the sides of the Oreo cookie to create bat wings. Add the candy eyes, and you’ve got spooky little Oreo bats to go along with your spiders.
- Mini Spider Bites: Use mini Oreos for bite-sized spiders that are perfect for younger kids or as a smaller party treat. You can still use pretzel sticks for the legs, just break them in half to fit the smaller size.
- Peanut Butter Legs: For a twist on the legs, use thin pretzel sticks dipped in peanut butter. This adds a little more flavor and creates a thicker “leg” for your spider.
- Chocolate-dipped Spiders: For extra chocolatey spiders, dip the entire Oreo in melted chocolate before adding the legs and eyes. Let the chocolate harden, and you’ll have spooky chocolate-covered spider cookies.
Serving Suggestions:
- Side dishes: Serve these Oreo spiders alongside other fun Halloween treats like caramel apples, mummy hot dogs, or pumpkin cupcakes for a complete Halloween-themed snack table.
- Beverages: Pair these cookies with spooky drinks like “witch’s brew” (green punch), warm apple cider, or a kid-friendly chocolate milkshake.
- For kids: If you’re hosting a Halloween party for kids, you can create a “spider dessert bar” where they can decorate their own spiders and take them home as party favors.
Freezing and Storage:
- Storage: Store the Oreo spiders in an airtight container at room temperature for up to 3 days. If you’ve used pretzel legs, keep in mind that they can become soft over time due to the moisture in the cookie filling, so it’s best to make these spiders the day of or the day before serving.
- Freezing: These Oreo spiders don’t freeze well due to the pretzel legs becoming soggy in the freezer, so it’s best to enjoy them fresh. However, you can freeze the assembled Oreos (before adding the legs) and add the pretzels and candy eyes after thawing.
Special Equipment:
- Microwave-safe bowl: For melting the chocolate. You can also melt the chocolate in a double boiler if you prefer.
- Parchment paper or silicone mat: This helps to prevent the spiders from sticking while the chocolate sets.
- **To
othpicks**: These are handy for applying the melted chocolate to small areas like the candy eyes.
FAQ Section:
1. Can I use store-bought frosting instead of melted chocolate?
Absolutely! Store-bought frosting can work as the “glue” to hold the legs and eyes in place. Just make sure to use a thick frosting, so everything sticks properly.
2. What if I can’t find candy eyes?
No problem! You can use mini chocolate chips, M&Ms, or dots of frosting as eyes. You can even use small marshmallows cut in half with a chocolate dot in the center to create eyes.
3. Can I use gluten-free Oreos?
Yes! There are gluten-free Oreo options available, so you can make this recipe gluten-free. Just be sure to use gluten-free pretzel sticks as well.
4. Can I make these without pretzels?
If you’re not a fan of pretzels, you can use black licorice, gummy strings, or thin chocolate-dipped sticks for the legs.
5. How can I make these spiders nut-free?
This recipe is naturally nut-free as long as you don’t use any nut-based ingredients like peanut butter. Just double-check the candy eyes or any other decorations you use to ensure they’re nut-free.
Conclusion:
I’m so excited for you to try these Easy Oreo Spiders for Halloween! They’re such a fun, no-bake treat that’s perfect for any Halloween celebration. Whether you’re making them for a party, as a snack for your kids, or just for some festive fun in the kitchen, these spooky spiders are sure to be a hit. Plus, they’re super customizable—you can get creative with the decorations, the type of Oreos, and even the legs! Don’t forget to snap a photo and share your creations—I can’t wait to see your adorable (and creepy) Oreo spider treats! Have a spook-tacular Halloween! 👻🍬🕷️
Print
Easy Oreo Spiders for Halloween – Build Your Bite
- Total Time: 15 minutes
Description
When it comes to Halloween treats, I always find myself looking for something simple yet exciting to make with my family. That’s where these Easy Oreo Spiders come in—they’re such a hit with everyone, especially the kids. My family absolutely loves them! We made these last Halloween, and they didn’t even last an hour on the table. It was so fun to make them together, and the best part is how adorable they turn out. These spiders might look spooky, but they are absolutely delicious. The combination of the creamy Oreo filling, crunchy pretzel legs, and the sweetness of the candy eyes makes them irresistible. If you’re looking for a no-bake, stress-free Halloween treat, you’ve found it!
Ingredients
To make these cute little Oreo spiders, you only need a handful of ingredients. It’s super simple!
- Oreos – The star of the show! You can use the original or any flavored Oreo you like.
- Mini pretzel sticks – These are perfect for the spider legs.
- Candy eyes – You can find these at most grocery stores or craft stores during the Halloween season.
- Chocolate chips or melted chocolate – This acts as a glue to hold everything together.
- Mini M&M’s or other small candy (optional) – For some extra fun decoration, or if you want to get creative with your spiders.
Instructions
- Prepare the Oreos: Gently twist the Oreo cookies apart, trying to keep the cream filling intact on one side.
- Create the spider legs: Break the mini pretzel sticks in half and carefully insert four pieces into the cream filling of each Oreo on either side, making sure they are evenly spaced out to form the spider legs. These pretzels will stick into the cream filling pretty easily.
- Reassemble the Oreo: Once the pretzel legs are in place, carefully press the two sides of the Oreo back together. You can add a dab of melted chocolate in the middle to help them stick better if needed.
- Attach the eyes: Melt some chocolate chips in the microwave, stirring every 30 seconds until fully melted. Using a toothpick or a small spoon, dab a bit of melted chocolate onto the back of the candy eyes, then stick them on top of the Oreo spider. You can place two eyes or get creative and use more if you like!
- Decorate with candy (optional): If you want, you can also add a little candy or sprinkles on the body of the spider for extra flair. Just use a bit of melted chocolate to glue it on.
- Let them set: Allow the spiders to sit for a few minutes until the chocolate hardens, securing the eyes and any other decorations.
- Serve and enjoy! Your adorable Oreo spiders are now ready to be devoured.
- Prep Time: 10 minutes
Nutrition
- Serving Size: 12
- Calories: 180

