Introduction
If there’s one drink that feels like a big hug in a glass, it’s this dreamy caramel milkshake. Imagine the creamiest, dreamiest milkshake you’ve ever had, made with rich, velvety caramel that melts perfectly into vanilla ice cream and milk. It’s the perfect blend of sweet, smooth, and refreshing. The caramel sauce adds the ideal amount of richness, while the vanilla ice cream keeps things perfectly balanced.
I first stumbled upon the magic of caramel milkshakes when I was a kid. My family would occasionally treat us to milkshakes at a little diner near our house, and I’d always order a caramel one. There was something about the sweetness of the caramel, the smoothness of the milkshake, and the coldness of the ice cream that just hit the spot. Over time, it became a favorite that I had to re-create at home—and now I’m sharing it with you. Trust me, once you try this, it’ll quickly become your go-to dessert or treat to cool off after a long day.
Not only is this milkshake crazy delicious, but it’s also so easy to whip up, making it a perfect option when you’re craving something sweet but don’t want to spend hours in the kitchen. Whether you’re enjoying it by yourself as a treat or making it for friends or family, this Dreamy Caramel Milkshake will surely be a hit!
Why You’ll Love This Recipe
There are so many reasons to fall in love with this dreamy caramel milkshake:
- Quick and Easy: With just a few ingredients, this milkshake comes together in minutes. Perfect for when you want something indulgent but don’t want to spend all day in the kitchen.
- Creamy and Dreamy: The caramel sauce swirled with vanilla ice cream makes this milkshake incredibly creamy, with just the right amount of sweetness.
- Customizable: You can tweak the ingredients to make it your own! Add extra caramel for more sweetness, or throw in a little sea salt for a salted caramel twist.
- Perfect for Any Occasion: Whether you’re having a lazy afternoon, celebrating a special occasion, or treating yourself after a busy day, this caramel milkshake always hits the spot. It’s also a great addition to birthday parties or casual get-togethers!
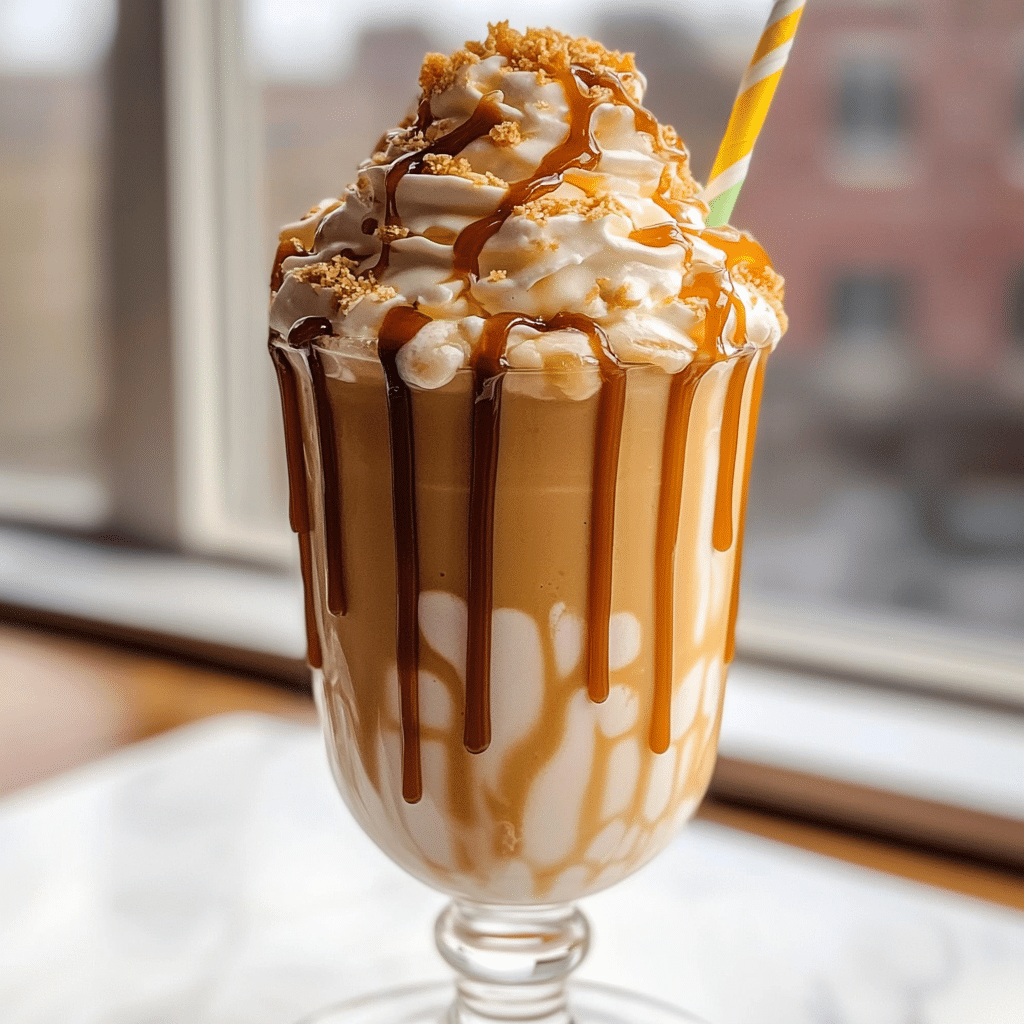
The first time I made this milkshake at home, I couldn’t believe how easy it was to recreate that diner-quality drink. The best part? You can make it just the way you like it—rich, thick, and extra caramelly, or light and refreshing. I always love topping mine with whipped cream and a drizzle of caramel sauce, but you can make it as fancy (or simple) as you like!
Preparation Time and Servings
Total Time: 10 minutes (prep time: 5 minutes, blending: 5 minutes)
Servings: This recipe makes 2 large milkshakes, but feel free to adjust the quantities depending on how many people you’re serving (or how many milkshakes you want to indulge in!)
Calories per serving: 350 (based on 1 milkshake with regular vanilla ice cream and caramel sauce)
Ingredients
Let’s break down the simple ingredients that make this Dreamy Caramel Milkshake so irresistible. Each one plays a role in making sure you get that perfect blend of sweetness and creaminess.
- Vanilla Ice Cream (2 cups): The base of the milkshake! It’s important to use a good-quality vanilla ice cream. You want one that’s creamy and smooth because it provides the perfect contrast to the rich caramel. You can even use a caramel-flavored ice cream if you want an extra boost of caramel flavor!
- Milk (1 cup): Full-fat milk is ideal, but you can use any kind you prefer, including almond milk or oat milk for a dairy-free option. Milk adds that smoothness that makes the milkshake easy to sip and perfectly creamy.
- Caramel Sauce (1/2 cup): Here’s where the magic happens. You can use store-bought caramel sauce, or if you’re feeling extra, you can make your own from scratch! Either way, this ingredient adds the most divine, smooth sweetness to your milkshake. I usually go for a rich, buttery caramel sauce to give that extra indulgence.
- Whipped Cream (optional, for topping): This is totally optional, but I love adding a little dollop of whipped cream to the top for some extra fluffiness and that visual ‘wow’ factor. You can also add a sprinkle of crushed caramel candies or a drizzle of more caramel sauce on top!
Step-by-Step Instructions
Now that we have everything we need, let’s get into the good stuff—making this milkshake! Trust me, it’s so easy to make, you’ll be sipping away in no time.
Step 1: Prepare Your Ingredients
Start by gathering your ingredients. If you’re using store-bought caramel sauce, make sure it’s at room temperature so it mixes easily. For homemade caramel sauce, just be sure to have it ready and cooled before using. Same goes for the ice cream—let it sit out for a couple of minutes before scooping to make the blending process smoother.
Step 2: Blend the Milkshake
In a blender, add the vanilla ice cream, milk, and caramel sauce. I like to start with the ice cream and caramel first, then pour in the milk. This ensures the milkshake blends more easily without too much splashing. Blend on medium speed until smooth and creamy, about 30 seconds to 1 minute, depending on the power of your blender.
If your milkshake is too thick for your liking, add a bit more milk until you reach your desired consistency. If it’s too thin, throw in another scoop of ice cream.
Step 3: Taste Test
This is where the fun begins! After blending, taste the milkshake to see if you want more caramel or vanilla. If you’re a caramel lover like me, don’t hesitate to drizzle a little more caramel sauce in and blend for a second or two.
Step 4: Serve and Garnish
Pour the milkshake into two tall glasses. Top with whipped cream if you’d like, and drizzle with extra caramel sauce. You can even add a sprinkle of crushed caramel candies or a pinch of sea salt for a little extra flavor kick.

How to Serve
This milkshake is an indulgent treat all on its own, but here are a few ways to elevate your experience:
- Serve with a Side of Cookies: Grab some of your favorite cookies (chocolate chip, oatmeal, or even shortbread) for a sweet treat pairing that complements the caramel flavor beautifully.
- Enjoy it as Dessert: This milkshake is perfect for dessert after a comforting meal like a big bowl of pasta or a homemade pizza night.
- Garnish with Fun Toppings: Want to make it more decadent? Add crushed nuts, mini chocolate chips, or even sprinkles for a festive look.
Additional Tips
Here are a few tips to ensure your caramel milkshake turns out perfectly every time:
- Use a Good-Quality Ice Cream: This is key. Using a rich, creamy vanilla ice cream will give you a much smoother milkshake. If you can, go for one that has a little extra butterfat—it makes the milkshake feel extra luxurious.
- Chill Your Glasses: For an extra touch of indulgence, chill your glasses in the freezer for 5-10 minutes before serving. This helps keep the milkshake cold longer.
- Make It Extra Caramel-ly: If you want a super caramel-heavy flavor, try adding a little caramel extract or caramel-flavored ice cream.
- Blending Tip: If your blender isn’t powerful, chop the ice cream into smaller chunks to make the blending process easier.
- Don’t Skip the Whipped Cream: While optional, whipped cream adds a nice light texture that balances the sweetness of the caramel milkshake.
Recipe Variations
This Dreamy Caramel Milkshake is so versatile! Here are some variations to switch things up:
- Salted Caramel Milkshake: Add a pinch of flaky sea salt to the caramel sauce or sprinkle it on top for a salted caramel version that gives your milkshake a lovely contrast of flavors.
- Coffee Caramel Milkshake: Add a shot of espresso or a splash of cold brew coffee to the milkshake for a delicious coffee-caramel flavor combo.
- Caramel Brownie Milkshake: Toss in a few chunks of brownie to make a caramel brownie milkshake. It adds extra richness and texture!
- Vegan Option: Use dairy-free ice cream, almond milk, and dairy-free whipped cream to make this treat vegan-friendly.
Freezing and Storage
While milkshakes are best enjoyed fresh, you can freeze the extra mixture for later use.
- Storing Leftovers: If you have any leftovers, pour the milkshake into an airtight container and store it in the freezer for up to 2 days. When you’re ready to enjoy it again, simply let it soften at room temperature for a few minutes before serving.
- Freezing for Later: If you make a big batch, you can freeze individual portions in freezer-safe cups for a quick treat anytime. Just let them thaw for a few minutes, then blend again to make it creamy and smooth.
FAQ Section
Can I use store-bought caramel sauce?
Absolutely! Just make sure to heat it slightly before using to get a smooth consistency. Homemade caramel sauce is always an option if you want to go the extra mile!
Can I make this ahead of time?
Yes! You can prep the caramel milkshake mixture and store it in the fridge for a few hours before blending it up when you’re ready to serve.
What if I don’t have vanilla ice cream?
No worries! You can use other flavors of ice cream, like caramel or even chocolate, for a different twist. But vanilla will always give you that classic taste.

Dreamy Caramel Milkshake
- Total Time: 10 minutes
Ingredients
- Vanilla Ice Cream (2 cups): The base of the milkshake! It’s important to use a good-quality vanilla ice cream. You want one that’s creamy and smooth because it provides the perfect contrast to the rich caramel. You can even use a caramel-flavored ice cream if you want an extra boost of caramel flavor!
- Milk (1 cup): Full-fat milk is ideal, but you can use any kind you prefer, including almond milk or oat milk for a dairy-free option. Milk adds that smoothness that makes the milkshake easy to sip and perfectly creamy.
- Caramel Sauce (1/2 cup): Here’s where the magic happens. You can use store-bought caramel sauce, or if you’re feeling extra, you can make your own from scratch! Either way, this ingredient adds the most divine, smooth sweetness to your milkshake. I usually go for a rich, buttery caramel sauce to give that extra indulgence.
- Whipped Cream (optional, for topping): This is totally optional, but I love adding a little dollop of whipped cream to the top for some extra fluffiness and that visual ‘wow’ factor. You can also add a sprinkle of crushed caramel candies or a drizzle of more caramel sauce on top!
Instructions
Step 1: Prepare Your Ingredients
Start by gathering your ingredients. If you’re using store-bought caramel sauce, make sure it’s at room temperature so it mixes easily. For homemade caramel sauce, just be sure to have it ready and cooled before using. Same goes for the ice cream—let it sit out for a couple of minutes before scooping to make the blending process smoother.
Step 2: Blend the Milkshake
In a blender, add the vanilla ice cream, milk, and caramel sauce. I like to start with the ice cream and caramel first, then pour in the milk. This ensures the milkshake blends more easily without too much splashing. Blend on medium speed until smooth and creamy, about 30 seconds to 1 minute, depending on the power of your blender.
If your milkshake is too thick for your liking, add a bit more milk until you reach your desired consistency. If it’s too thin, throw in another scoop of ice cream.
Step 3: Taste Test
This is where the fun begins! After blending, taste the milkshake to see if you want more caramel or vanilla. If you’re a caramel lover like me, don’t hesitate to drizzle a little more caramel sauce in and blend for a second or two.
Step 4: Serve and Garnish
Pour the milkshake into two tall glasses. Top with whipped cream if you’d like, and drizzle with extra caramel sauce. You can even add a sprinkle of crushed caramel candies or a pinch of sea salt for a little extra flavor kick.
- Prep Time: 5 minutes
Nutrition
- Serving Size: 2
- Calories: 350
Conclusion
This Dreamy Caramel Milkshake is the perfect indulgence when you’re craving something sweet, creamy, and satisfying. Whether you’re treating yourself after a long day or sharing it with loved ones, this milkshake will make everyone smile. I hope you’re as excited to try this as I was when I first made it! Don’t forget to take a picture and tag me on Instagram—I’d love to see your caramel milkshake creations!

