Introduction
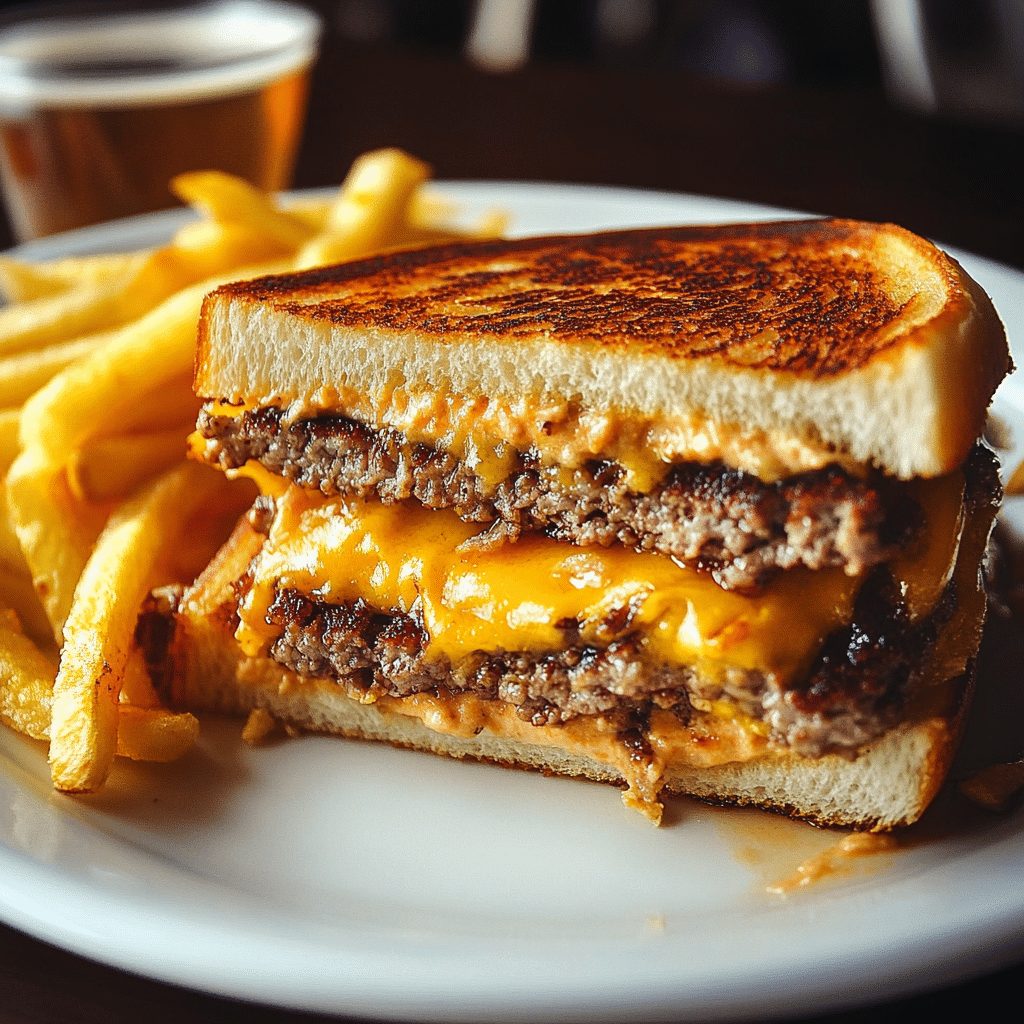
Ah, the patty melt. It’s one of those timeless recipes that never fails to hit the spot. Imagine biting into a crispy, buttery sandwich with a juicy beef patty, melted cheese, and caramelized onions, all sandwiched between two slices of perfectly toasted bread. There’s something about this combo that feels like a warm hug on a plate.
I first discovered the patty melt in a little diner during a road trip. The moment I took my first bite, I was hooked. The contrast of the gooey cheese with the savory beef and the sweetness of the onions was heavenly! It quickly became my go-to comfort food whenever I wanted something indulgent yet simple to make at home.
What makes this patty melt recipe so special is its ease of preparation. You can whip it up on a busy weeknight or serve it at a casual get-together with friends. Plus, you can customize it to your liking, whether that means adding extra cheese, trying different bread, or swapping in turkey or veggie patties.
So, roll up your sleeves, and let’s dive into this classic recipe that’s bound to impress everyone at the dinner table. I promise it’ll become a favorite in your household, just like it is in mine!
Why You’ll Love This Recipe
Here are just a few reasons why this patty melt recipe is a must-try:
- Easy to Make: With minimal prep time and simple ingredients, you’ll have dinner on the table in no time. If you can make a grilled cheese sandwich, you can make a patty melt!
- Family-Friendly: This recipe is perfect for both kids and adults. The melty cheese and delicious beef make it appealing to everyone. Plus, it’s a fun twist on the classic burger that kids will love.
- Rich in Flavor: The combination of the beef patty, gooey cheese, and sweet caramelized onions creates a burst of flavor in every bite. The crispy, buttery bread adds a delightful crunch, making it a well-rounded meal.
- Customizable: Want to kick it up a notch? Add some sautéed mushrooms or a slice of crispy bacon. Prefer a lighter option? Use turkey or a veggie patty! The possibilities are endless.
Once you make this recipe, I bet it’ll quickly become a favorite in your meal rotation. Let’s get started!
Preparation Time and Servings
- Total Time: 30 minutes
- Servings: 4
Nutrition Facts:
Calories per serving: 550
Protein: 30g
Carbs: 40g
Fat: 30g
Ingredients
Here’s what you’ll need for a delicious patty melt:
- 1 lb ground beef (80/20): This fat ratio ensures juicy, flavorful patties.
- 1 large onion, thinly sliced: For that sweet caramelized goodness.
- 4 slices of American cheese: Melty and gooey – the classic choice!
- 8 slices of rye or sourdough bread: Choose your favorite bread for toasting.
- 2 tablespoons butter: For that perfect golden-brown crust.
- Salt and pepper: Essential for seasoning the patties.
- Optional: Pickles or special sauce for serving.
These ingredients are all straightforward and can be easily found at your local grocery store. Feel free to swap in different cheeses or bread if you prefer!
Step-by-Step Instructions
1. Prep the Onions
- In a medium skillet, melt 1 tablespoon of butter over medium heat. Add the thinly sliced onions and a pinch of salt.
- Cook, stirring occasionally, for about 15-20 minutes, or until the onions are soft and caramelized. They should turn a lovely golden brown. If they start to stick, add a splash of water to deglaze the pan.
2. Make the Patties
- While the onions are cooking, shape the ground beef into four equal patties. Try to make them slightly larger than the bread since they’ll shrink while cooking.
- Season both sides with salt and pepper.
3. Cook the Patties
- In a separate skillet, heat a tablespoon of butter over medium-high heat. Once hot, add the beef patties. Cook for about 3-4 minutes on one side without moving them around to get a nice sear.
- Flip the patties and cook for another 3-4 minutes for medium-rare, or until they reach your desired doneness. In the last minute of cooking, place a slice of cheese on each patty to melt. Cover the skillet with a lid to help the cheese melt faster.
4. Assemble the Patty Melts
- Once the patties are cooked, remove them from the skillet and set them aside. In the same skillet, add the remaining butter and lower the heat to medium.
- Lay out 4 slices of bread in the skillet. Top each with a cheesy patty, then a generous scoop of caramelized onions, and finish with another slice of bread.
5. Grill the Sandwiches
- Grill each sandwich for about 3-4 minutes per side, or until the bread is golden brown and crispy, and the cheese is fully melted. You can use a spatula to press down slightly to ensure even cooking.
- Keep an eye on them to prevent burning, and adjust the heat as necessary.
6. Serve
- Once they’re perfectly grilled, remove the patty melts from the skillet and let them rest for a minute. Then, slice in half and serve with your favorite pickles or dipping sauces.
Tip: If you want extra crispy bread, you can toast the bread separately and then assemble the patty melt. This gives it a lovely crunch!
How to Serve
Here are a few serving suggestions to elevate your patty melt experience:
- With a Side of Fries: Classic crinkle-cut fries or sweet potato fries make a perfect pairing.
- Fresh Salad: A light arugula salad with a lemon vinaigrette balances the richness of the patty melt beautifully.
- Dipping Sauce: Try serving with a side of tangy ketchup or a homemade special sauce (mix mayo, ketchup, and a dash of mustard for a creamy dip).
- Pickles: Don’t forget the pickles! Their crunch and acidity cut through the richness of the melt, making each bite even more satisfying.
Additional Tips
Here are some helpful tips to ensure your patty melts turn out perfectly:
- Drain the Onions: If your caramelized onions are too greasy, drain them on a paper towel to avoid soggy sandwiches.
- Use a Meat Thermometer: For perfectly cooked patties, a meat thermometer can help you check doneness. Aim for 160°F for ground beef.
- Customize the Cheese: Feel free to experiment with different types of cheese! Swiss or cheddar can be fantastic alternatives to American cheese.
- Grill in Batches: If you’re making multiple sandwiches, consider grilling them in batches. This way, you can focus on getting each one perfectly toasted without burning.
- Rest the Patties: Letting the cooked patties rest for a minute before assembling allows the juices to redistribute, ensuring a juicy bite.
Recipe Variations
Want to mix things up? Here are a few fun variations on the classic patty melt:
- Veggie Option: Swap the beef patty for a grilled portobello mushroom cap or a plant-based burger for a delicious vegetarian twist.
- Spicy Kick: Add jalapeños or a dash of hot sauce to the beef mixture before cooking for a spicy version.
- Mushroom Melt: Sauté mushrooms along with the onions for an earthy flavor boost. You can even replace some of the beef with finely chopped mushrooms for a unique take.
- Bacon Lover’s Patty Melt: Add crispy bacon to the mix! Just layer some crispy bacon on top of the patty before adding the cheese for a smoky flavor.
- French Onion Patty Melt: Incorporate a beef broth drizzle or French onion soup mix into the onions for an even richer flavor profile.
Serving Suggestions
Here are some side dishes and beverages that pair perfectly with your classic patty melt:
- Side Dishes: Serve with crispy potato chips, coleslaw, or a side of roasted vegetables for a well-rounded meal.
- Beverage Pairing: A cold beer or a classic soda is a great choice to complement the hearty flavors of the patty melt. If you prefer something lighter, an iced tea or lemonade works wonderfully.
- For Kids: Make mini patty melts using slider buns for a kid-friendly option. They’re perfect for little hands and still pack all the delicious flavors!
Freezing and Storage
If you happen to have leftovers (though I doubt it!), here’s how to store or freeze your patty melts:
- Storage: Place leftover patty melts in an airtight container and store them in the refrigerator for up to 2 days. To reheat, use a skillet on low heat to restore the crispy texture.
- Freezing: You can also freeze cooked patty melts. Wrap each sandwich tightly in foil or freezer wrap and store in a freezer-safe bag. They can be frozen for up to 3 months.
- Reheating Frozen Patty Melts: When you’re ready to enjoy them again, remove from the freezer and thaw in the refrigerator overnight. Reheat in a skillet over medium heat until warmed through and crispy.
Frequently Asked Questions (FAQ)
1. What kind of cheese is best for a patty melt?
While American cheese is the classic choice for its meltability and flavor, you can also use Swiss, cheddar, or even pepper jack for a little heat. Mixing different cheeses can also create a delicious flavor profile.
2. Can I make a patty melt with turkey or veggie patties?
Absolutely! Turkey or plant-based patties work wonderfully in a patty melt. Just ensure they are seasoned well and cooked thoroughly, as turkey can dry out more than beef.
3. What’s the best bread for a patty melt?
Rye and sourdough are traditional choices that add great flavor. However, you can use any sturdy bread that can hold up to the fillings, such as whole wheat or even Texas toast.
4. Can I make the caramelized onions ahead of time?
Yes! Caramelized onions can be made in advance and stored in the refrigerator for up to a week. Just reheat them before assembling your patty melts.
5. How do I store leftover patty melts?
Place any leftovers in an airtight container in the refrigerator for up to 2 days. You can also freeze them wrapped tightly in foil for up to 3 months. Reheat in a skillet or toaster oven for the best texture.
6. Can I add toppings to my patty melt?
Definitely! Feel free to customize your patty melt with toppings like bacon, mushrooms, jalapeños, or even a fried egg. The beauty of the patty melt is its versatility!
7. How do I make sure my patties don’t fall apart while cooking?
To prevent your patties from falling apart, be gentle when shaping them, and avoid overworking the meat. Ensure they are well-seasoned and form them into even thickness. Let them rest for a few minutes before cooking.
8. Can I grill my patty melts instead of using a skillet?
Yes! If you prefer, you can grill your patty melts on a barbecue or grill pan. Just make sure to monitor the heat so the bread doesn’t burn while the cheese melts.
9. How can I make my patty melts healthier?
To make a lighter version, use leaner ground beef or turkey, whole grain bread, and plenty of veggies. You can also skip the butter for toasting and opt for a non-stick spray or brush with olive oil instead.
10. What sides go well with a patty melt?
Classic sides include fries, potato chips, or a fresh salad. You could also serve it with coleslaw, pickles, or a side of your favorite dipping sauce.
Print
Classic Patty Melt Recipe
- Total Time: 30 minutes
Ingredients
Here’s what you’ll need for a delicious patty melt:
- 1 lb ground beef (80/20): This fat ratio ensures juicy, flavorful patties.
- 1 large onion, thinly sliced: For that sweet caramelized goodness.
- 4 slices of American cheese: Melty and gooey – the classic choice!
- 8 slices of rye or sourdough bread: Choose your favorite bread for toasting.
- 2 tablespoons butter: For that perfect golden-brown crust.
- Salt and pepper: Essential for seasoning the patties.
- Optional: Pickles or special sauce for serving.
Instructions
1. Prep the Onions
- In a medium skillet, melt 1 tablespoon of butter over medium heat. Add the thinly sliced onions and a pinch of salt.
- Cook, stirring occasionally, for about 15-20 minutes, or until the onions are soft and caramelized. They should turn a lovely golden brown. If they start to stick, add a splash of water to deglaze the pan.
2. Make the Patties
- While the onions are cooking, shape the ground beef into four equal patties. Try to make them slightly larger than the bread since they’ll shrink while cooking.
- Season both sides with salt and pepper.
3. Cook the Patties
- In a separate skillet, heat a tablespoon of butter over medium-high heat. Once hot, add the beef patties. Cook for about 3-4 minutes on one side without moving them around to get a nice sear.
- Flip the patties and cook for another 3-4 minutes for medium-rare, or until they reach your desired doneness. In the last minute of cooking, place a slice of cheese on each patty to melt. Cover the skillet with a lid to help the cheese melt faster.
4. Assemble the Patty Melts
- Once the patties are cooked, remove them from the skillet and set them aside. In the same skillet, add the remaining butter and lower the heat to medium.
- Lay out 4 slices of bread in the skillet. Top each with a cheesy patty, then a generous scoop of caramelized onions, and finish with another slice of bread.
5. Grill the Sandwiches
- Grill each sandwich for about 3-4 minutes per side, or until the bread is golden brown and crispy, and the cheese is fully melted. You can use a spatula to press down slightly to ensure even cooking.
- Keep an eye on them to prevent burning, and adjust the heat as necessary.
6. Serve
- Once they’re perfectly grilled, remove the patty melts from the skillet and let them rest for a minute. Then, slice in half and serve with your favorite pickles or dipping sauces.
Nutrition
- Serving Size: 4
- Calories: 550
- Fat: 30g
- Carbohydrates: 40g
- Protein: 30g
Conclusion
There you have it! A delicious and classic patty melt recipe that’s sure to impress your family and friends. Whether you’re enjoying it for a casual dinner, a game-day treat, or a late-night snack, this sandwich is all about comfort and flavor. The combination of a juicy beef patty, melted cheese, and sweet caramelized onions all tucked into crispy bread is simply irresistible.
Remember, the beauty of a patty melt lies in its versatility. Feel free to customize it to your taste, whether you want to go all out with toppings or keep it simple and classic. The key is to have fun and enjoy the cooking process!
Next time you’re in need of a comforting meal, don’t hesitate to whip up this classic patty melt. It’s a recipe that’s bound to become a staple in your kitchen, just like it is in mine. Happy cooking, and enjoy every delicious bite!

