Introduction
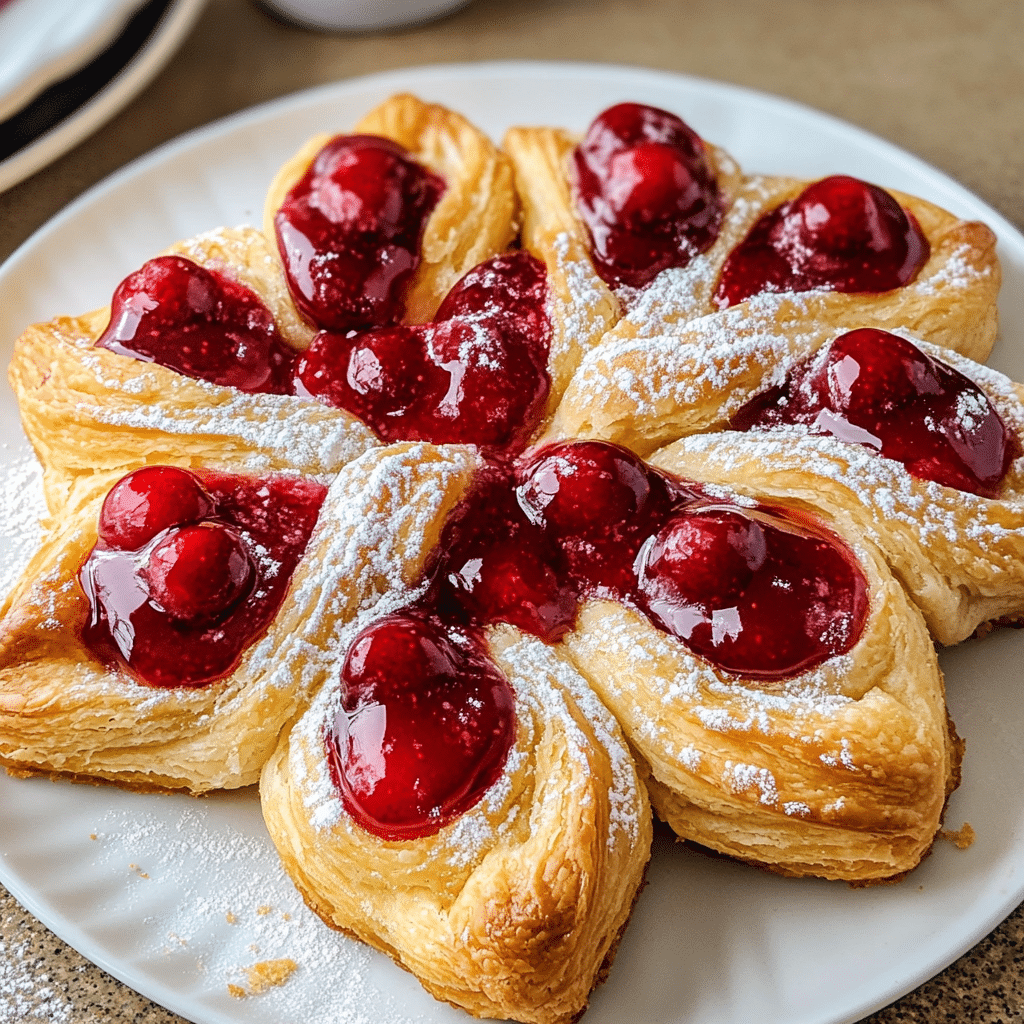
There’s something undeniably special about a fresh, warm pastry right out of the oven—especially when it’s a Cherry Cheese Danish. Imagine biting into a perfectly golden, flaky puff pastry that’s tender on the inside, with a luscious cream cheese filling that’s just the right balance of tangy and sweet. The addition of plump, juicy cherries makes it even better, giving each bite a burst of fresh, fruity goodness. Whether you’re enjoying it for breakfast with a hot cup of coffee or serving it as a sweet treat for dessert, this Cherry Cheese Danish is sure to impress.
I first discovered how much I love these Danishes on a cozy weekend brunch with my family. We were at a local bakery, and I had just one bite of a Cherry Cheese Danish, and it became an instant favorite. The soft cheese filling paired with the tart cherries had me hooked. Ever since, I’ve been on a mission to recreate that perfect pastry at home, and let me tell you—this recipe does not disappoint! With just a few ingredients and a little bit of patience, you’ll have your own batch of fresh Cherry Cheese Danishes, and trust me, it’ll become a staple in your kitchen.
This recipe combines the classic, buttery puff pastry with a sweet and creamy filling, topped off with the burst of juicy cherries that’s hard to resist. It’s so easy to make and perfect for breakfast or an afternoon snack. The great thing is that you don’t need to be an expert baker to achieve that bakery-quality taste—just follow these simple steps, and you’ll be enjoying your homemade Cherry Cheese Danishes in no time!
Why You’ll Love This Recipe
- Deliciously Creamy Filling: The cream cheese filling is the heart of this Danish. It’s rich and velvety with a slight tang from the cream cheese, perfectly complemented by the sweetness of the powdered sugar and vanilla. It’s the kind of filling that you’ll want to spread on everything!
- Flaky and Buttery Puff Pastry: Puff pastry is one of those baking marvels that can be a little intimidating at first, but once you get the hang of it, you’ll love how it creates light, flaky layers with every bite. When baked, the pastry turns golden brown with a satisfying crunch around the edges, giving you the ideal texture contrast to the creamy filling.
- Tart and Sweet Cherries: Cherries add a pop of color and flavor, cutting through the richness of the cheese filling. You can use fresh or jarred cherries, but I love the fresh cherry topping during the summer months when they’re in season. The tartness balances out the sweetness of the cream cheese beautifully.
- Versatile and Perfect for Any Occasion: Whether you’re serving them at a brunch gathering, as an after-school snack, or just for yourself (hey, no judgment!), these Cherry Cheese Danishes will always be a crowd-pleaser. The best part? They’re surprisingly easy to make, and you’ll feel like a pastry chef when you pull them out of the oven.
Preparation Time and Servings
- Total Time: 1 hour 15 minutes (including prep and baking time)
- Prep Time: 25 minutes
- Cook Time: 25-30 minutes
- Servings: 8 Danishes
Nutrition Facts:
- Calories per serving: 350
- Protein: 4g
- Carbs: 45g
- Fat: 18g
- Sugar: 15g
Ingredients
Here’s what you’ll need to make these delicious Cherry Cheese Danishes:
Pastry
- 1 sheet of puff pastry (store-bought, thawed)
- 1 tablespoon of flour (for dusting the work surface)
Cream Cheese Filling
- 8 oz cream cheese, softened
- 1/4 cup powdered sugar
- 1 teaspoon vanilla extract
- 1 tablespoon heavy cream (optional, for creamier filling)
Cherry Topping
- 1 cup fresh cherries, pitted and halved (or 1/2 cup cherry preserves)
- 1 tablespoon sugar (optional, for extra sweetness)
- 1 teaspoon lemon juice (to balance the sweetness)
Egg Wash
- 1 egg, beaten with 1 tablespoon of water
Why these ingredients are essential:
- Puff Pastry: The key to the perfect flaky Danish. Puff pastry puffs up beautifully when baked, creating layers of flakiness that are the hallmark of any Danish.
- Cream Cheese: The creamy base for the filling. It provides that delicious, slightly tangy flavor that pairs perfectly with the sweet cherries.
- Cherries: The cherry topping adds the perfect burst of fruity sweetness and a pop of color, making these Danishes irresistible.
Step-by-Step Instructions
- Preheat the Oven and Prepare Your Baking Sheet
Start by preheating your oven to 375°F (190°C). Line a baking sheet with parchment paper to prevent the Danishes from sticking during baking. This will make cleanup so much easier! - Prepare the Puff Pastry
Roll out the puff pastry on a lightly floured surface. You want to make sure the pastry is smooth and even. If you’re using store-bought puff pastry, it usually comes in squares, so cut it into 8 equal squares for individual servings. If you’re feeling adventurous, you could even go for triangles or circles, but squares are just the easiest and quickest option. - Make the Cream Cheese Filling
In a medium-sized bowl, mix the softened cream cheese, powdered sugar, vanilla extract, and heavy cream (if using). Use a hand mixer or whisk to blend everything until smooth and creamy. Taste the filling—if you like it sweeter, you can add a little more powdered sugar to suit your taste. - Assemble the Danishes
Take each puff pastry square and create a border by gently scoring a line about 1 inch from the edge of the pastry. This will help the filling stay inside while the pastry puffs up.
Spoon about 1 to 2 tablespoons of the cream cheese filling into the center of each square, spreading it evenly within the scored border. - Prepare the Cherry Topping
If you’re using fresh cherries, pit and halve them. If you’re using cherry preserves, you can simply spoon about a tablespoon on top of each Danish. If using fresh cherries, you can sprinkle a tiny bit of sugar on them if you’d like them sweeter. Also, squeeze a little lemon juice over the cherries to brighten their flavor. - Egg Wash
Brush the edges of the puff pastry with the beaten egg wash. This will give your pastries a golden, shiny finish once baked. The egg wash also helps seal in the cream cheese filling while it bakes. - Bake the Danishes
Place the assembled Danishes on the prepared baking sheet and bake them in the preheated oven for 25-30 minutes or until the puff pastry is golden and puffed up, and the filling is slightly set. Be sure to check the pastries around the 20-minute mark to avoid over-baking. - Let Cool and Serve
Once the Danishes are done, remove them from the oven and let them cool for about 5 minutes. The filling will be hot, so be careful when you take your first bite! These are best enjoyed warm, but they also taste great at room temperature.

How to Serve
These Cherry Cheese Danishes are perfect on their own, but you can also serve them alongside:
- Coffee or Tea: They’re perfect for breakfast or a mid-morning treat with a hot cup of coffee or tea.
- Whipped Cream or Ice Cream: For a fancier dessert, top them with a dollop of whipped cream or a scoop of vanilla ice cream.
- Fruit Salad: A fresh fruit salad on the side would complement the sweetness of the cherries nicely.
Additional Tips
- Use Cold Puff Pastry: Keep your puff pastry cold before using it. It puffs up better when it’s cold, so don’t let it sit out for too long.
- Drain Excess Liquid from Cherries: If using fresh cherries, make sure they’re not too watery. You can place them on paper towels for a minute or two before adding them to the pastry.
- Don’t Overfill: While it’s tempting to pile on the cream cheese filling, don’t overdo it! Leave room for the pastry to puff up and form its flaky layers.
- Make Ahead: You can prepare the Danishes the night before. Assemble everything, cover it, and refrigerate overnight. In the morning, just brush with the egg wash and bake!
- Glaze Option: For a little extra sweetness, drizzle some icing (powdered sugar mixed with milk) on top after baking. This adds a little extra touch of indulgence.
Recipe Variations
- Mixed Berries: If you’re not a fan of cherries, you can swap them out for other berries like raspberries, blueberries, or blackberries.
- Almond Filling: For an extra layer of flavor, you can mix in some almond extract with the cream cheese filling or add slivered almonds on top.
- Cinnamon Roll Danish: Add a pinch of cinnamon to the cream cheese filling and top the pastries with a cinnamon-sugar mixture for a cinnamon roll twist.
- Lemon Cream Cheese: For a tangy twist, add some lemon zest and a little bit of lemon juice to the cream cheese filling. The lemon pairs wonderfully with the cherries.
Frequently Asked Questions (FAQ)
1. Can I use a different type of fruit for the topping?
Yes! While cherries are the star of this recipe, you can definitely switch it up with other fruits. Fresh raspberries, blueberries, or even strawberries would work wonderfully. If you prefer, you can also use fruit preserves or jams in place of fresh fruit. Just keep in mind that some fruits may release more moisture, so be sure to drain them before adding to the Danish to avoid sogginess.
2. Can I make these Cherry Cheese Danishes ahead of time?
Absolutely! You can prepare the Danishes the night before. Assemble the pastries, but don’t bake them yet. Cover them with plastic wrap and refrigerate overnight. In the morning, simply brush with the egg wash and bake as directed. This is a great option if you’re planning for a brunch or want to save time in the morning.
3. Can I use store-bought cream cheese instead of making my own filling?
Store-bought cream cheese works perfectly in this recipe! You can use plain, full-fat cream cheese for the best texture. Just be sure to soften it to room temperature before mixing it with the sugar and vanilla to ensure a smooth filling.
4. What if I don’t have puff pastry?
If you don’t have puff pastry, you can substitute it with other pastry doughs, like croissant dough or even refrigerated pie crusts, though the texture may not be as flaky. Puff pastry is ideal because it puffs up during baking, creating the signature layers and flakiness of a Danish, but these substitutes will still produce delicious results.
5. Can I freeze Cherry Cheese Danishes?
Yes, you can freeze these Danishes! Once baked and cooled, wrap them tightly in plastic wrap and then in aluminum foil. When you’re ready to enjoy them, thaw them at room temperature and reheat in the oven at 350°F (175°C) for about 10 minutes, or until warmed through and crispy.

Cherry Cheese Danish
- Total Time: 1 hour
Ingredients
For the Pastry
- 1 sheet of puff pastry (store-bought, thawed)
- 1 tablespoon of flour (for dusting the work surface)
For the Cream Cheese Filling
- 8 oz cream cheese, softened
- 1/4 cup powdered sugar
- 1 teaspoon vanilla extract
- 1 tablespoon heavy cream (optional, for creamier filling)
For the Cherry Topping
- 1 cup fresh cherries, pitted and halved (or 1/2 cup cherry preserves)
- 1 tablespoon sugar (optional, for extra sweetness)
- 1 teaspoon lemon juice (to balance the sweetness)
For the Egg Wash
- 1 egg, beaten with 1 tablespoon of water
Instructions
- Preheat the Oven and Prepare Your Baking Sheet
Start by preheating your oven to 375°F (190°C). Line a baking sheet with parchment paper to prevent the Danishes from sticking during baking. This will make cleanup so much easier! - Prepare the Puff Pastry
Roll out the puff pastry on a lightly floured surface. You want to make sure the pastry is smooth and even. If you’re using store-bought puff pastry, it usually comes in squares, so cut it into 8 equal squares for individual servings. If you’re feeling adventurous, you could even go for triangles or circles, but squares are just the easiest and quickest option. - Make the Cream Cheese Filling
In a medium-sized bowl, mix the softened cream cheese, powdered sugar, vanilla extract, and heavy cream (if using). Use a hand mixer or whisk to blend everything until smooth and creamy. Taste the filling—if you like it sweeter, you can add a little more powdered sugar to suit your taste. - Assemble the Danishes
Take each puff pastry square and create a border by gently scoring a line about 1 inch from the edge of the pastry. This will help the filling stay inside while the pastry puffs up.
Spoon about 1 to 2 tablespoons of the cream cheese filling into the center of each square, spreading it evenly within the scored border. - Prepare the Cherry Topping
If you’re using fresh cherries, pit and halve them. If you’re using cherry preserves, you can simply spoon about a tablespoon on top of each Danish. If using fresh cherries, you can sprinkle a tiny bit of sugar on them if you’d like them sweeter. Also, squeeze a little lemon juice over the cherries to brighten their flavor. - Egg Wash
Brush the edges of the puff pastry with the beaten egg wash. This will give your pastries a golden, shiny finish once baked. The egg wash also helps seal in the cream cheese filling while it bakes. - Bake the Danishes
Place the assembled Danishes on the prepared baking sheet and bake them in the preheated oven for 25-30 minutes or until the puff pastry is golden and puffed up, and the filling is slightly set. Be sure to check the pastries around the 20-minute mark to avoid over-baking. - Let Cool and Serve
Once the Danishes are done, remove them from the oven and let them cool for about 5 minutes. The filling will be hot, so be careful when you take your first bite! These are best enjoyed warm, but they also taste great at room temperature.
- Prep Time: 25 minutes
- Cook Time: 25 minutes
Nutrition
- Serving Size: 8
- Calories: 350
- Sugar: 15g
- Fat: 18g
- Carbohydrates: 45g
- Protein: 4g
Conclusion
This Cherry Cheese Danish recipe is the perfect combination of flaky pastry, creamy filling, and juicy cherries. Whether you’re serving them at a brunch gathering, as a cozy treat with a hot drink, or for a special dessert, these Danishes will quickly become a family favorite. They’re easy to make, packed with flavor, and guaranteed to impress anyone who takes a bite. Plus, with so many variations to try, you can make these Danishes your own and experiment with different fillings and toppings. Give this recipe a try, and you’ll find yourself making these delicious pastries over and over again. Enjoy!

