Introduction
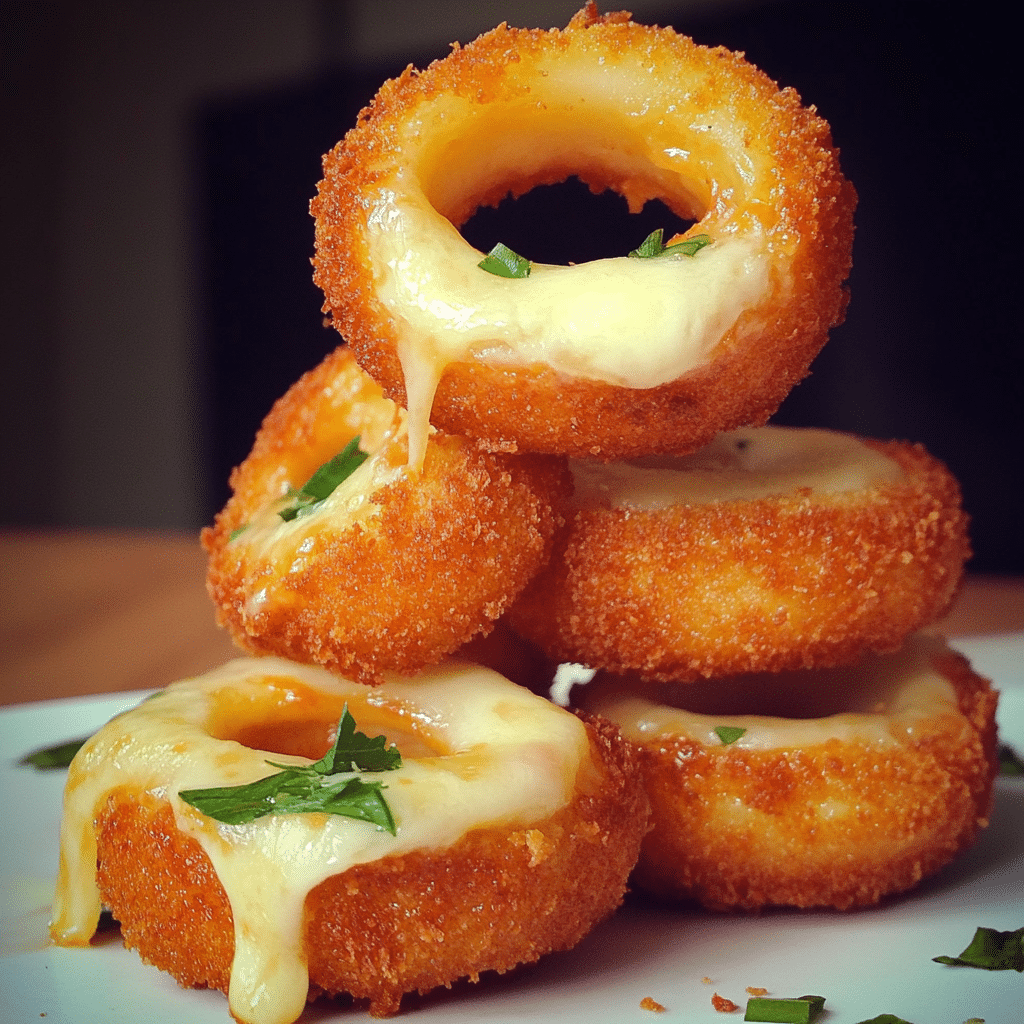
Crispy, cheesy, and downright irresistible, these Cheesy Stuffed Mozzarella Onion Rings are about to become your new favorite snack. There’s something magical about the combination of gooey mozzarella, tender onion, and crunchy breadcrumb coating. Imagine the satisfying crunch as you bite through the golden exterior, followed by the warm, melty mozzarella that stretches with every pull. Pure bliss!
I first discovered these beauties when I was experimenting in the kitchen for a game night snack. My goal was to create something indulgent but also a bit unique—and these onion rings delivered! They’ve quickly become a household favorite, especially for movie nights or get-togethers.
This recipe is super simple, and you only need a few basic ingredients to pull it together. Even if you’re not a pro in the kitchen, I’ll guide you step-by-step so you can whip up a batch with confidence. Ready to impress your friends and family with these mouthwatering mozzarella-stuffed onion rings? Let’s dive in!
Why You’ll Love This Recipe
These Cheesy Stuffed Mozzarella Onion Rings check all the boxes for a crowd-pleasing snack:
- Easy to Make: Minimal prep time, with simple ingredients that you probably already have at home.
- Cheese Lover’s Dream: Melted mozzarella takes these onion rings to a whole new level.
- Perfect Crunch: The breadcrumb coating creates a satisfying crunch that complements the soft, gooey cheese.
- Kid-Friendly: A hit with kids and adults alike—everyone loves these cheesy bites!
The flavor combo is out of this world: the slightly sweet onion with gooey mozzarella wrapped in a crispy breadcrumb shell creates a perfect harmony of textures and flavors. Whether you serve them as an appetizer, snack, or side dish, these onion rings will disappear fast.
Preparation Time and Servings
- Total Time: 30 minutes
- Servings: Makes approximately 12-15 onion rings
- Nutrition: Calories per serving: 150, Protein: 5g, Carbs: 10g, Fat: 10g
Ingredients
- 1 large yellow onion, peeled and sliced into thick rings (about ½ inch wide)
- 12-15 mozzarella sticks or mozzarella cut into 2-inch pieces
- 1 cup all-purpose flour
- 2 large eggs, beaten
- 1 ½ cups breadcrumbs (panko works best for extra crunch)
- ½ cup grated Parmesan cheese (optional, for added flavor)
- Salt and pepper to taste
- 1 tsp garlic powder (for extra flavor in the breadcrumb coating)
- Vegetable oil (for frying)
Each ingredient serves a purpose here:
- Yellow Onion: Sweet and mild, the perfect vessel for our cheesy filling.
- Mozzarella: Creates that oozy, melty center.
- Breadcrumbs: Adds the essential crunch to balance the creamy filling.
- Eggs: Helps the breadcrumbs stick and creates a thick, crispy coating.
Step-by-Step Instructions
1st step: Prepare the Onion Rings and Mozzarella Sticks
- Peel and slice the onion into thick rings, about ½ inch wide.
- Separate the onion slices and carefully select the larger outer rings.
- Take a mozzarella stick (or piece of mozzarella) and place it inside the larger onion ring. You want the cheese to fit snugly within the onion. If necessary, trim the mozzarella sticks to fit.
2nd step: Set Up Your Dredging Stations
- In three shallow bowls, set up the dredging stations:
- First bowl: Add flour.
- Second bowl: Beat eggs with a pinch of salt and pepper.
- Third bowl: Mix the breadcrumbs, Parmesan (if using), and garlic powder.
3rd step: Dredge the Onion Rings
- Take each stuffed onion ring and dredge it in the flour, making sure it’s evenly coated. Shake off any excess flour.
- Dip the floured onion ring into the egg mixture, allowing any excess egg to drip off.
- Press the onion ring into the breadcrumb mixture, coating it well on all sides. Repeat this process to ensure a double coating, which will help the cheese stay enclosed and add extra crunch.
4th step: Heat the Oil for Frying
- In a large, heavy-bottomed skillet or pot, pour vegetable oil to about 2 inches deep.
- Heat the oil to 350°F (175°C). Test the oil by dropping in a small piece of breadcrumb—if it sizzles and turns golden, it’s ready.
5th step: Fry the Onion Rings
- Carefully place 2-3 onion rings at a time into the hot oil, making sure not to overcrowd the pan.
- Fry for about 2-3 minutes on each side or until golden brown and crispy.
- Use a slotted spoon to transfer the fried onion rings to a plate lined with paper towels to drain any excess oil.
6th step: Keep Warm
- For batches, you can keep the fried onion rings warm in a 200°F oven until all rings are fried and ready to serve.
How to Serve
These Cheesy Stuffed Mozzarella Onion Rings are best served hot and fresh. Here are some fun serving suggestions:
- Classic Marinara: Serve with a side of warm marinara sauce for dipping.
- Ranch Dressing: The cool, creamy texture of ranch pairs perfectly with the hot, cheesy rings.
- Spicy Kick: Try a side of sriracha mayo for those who love a bit of heat.
Additional Tips
To make sure your onion rings turn out perfectly every time, here are some helpful tips:
- Freeze for 10 Minutes: After breading the onion rings, freeze them for 10 minutes to help the coating stay intact while frying.
- Monitor Oil Temperature: Keep an eye on the oil temperature for even cooking.
- Double Coat: Don’t skip the double coating process! This creates an extra-crispy shell that keeps the cheese from leaking.
- Drain Properly: Let them rest on paper towels after frying to remove excess oil.
- Serve Immediately: These are best enjoyed fresh, so serve them as soon as they’re fried.
Recipe Variations
- Gluten-Free: Use gluten-free breadcrumbs and flour to make this recipe gluten-free.
- Extra Spicy: Add cayenne pepper to the breadcrumb mixture for a little extra heat.
- Different Cheeses: Try using Monterey Jack, pepper jack, or even cheddar for a twist on the classic mozzarella.
Serving Suggestions
Looking to round out your meal? Here are some ideas to serve alongside these onion rings:
- Salad: A simple arugula or mixed greens salad with a light vinaigrette pairs well and balances the richness.
- Roasted Vegetables: Serve with a side of roasted bell peppers or zucchini for a colorful, nutritious addition.
- Mocktail: A refreshing lemonade or iced tea is perfect to wash down these cheesy bites.
Freezing and Storage
If you have leftovers (which I doubt!), you can freeze them:
- Storage: Place leftover onion rings in an airtight container in the fridge for up to 2 days.
- Freezing: Freeze breaded but uncooked rings on a baking sheet for an hour, then transfer to a freezer-safe bag for up to 3 months.
- Reheating: Reheat in the oven at 375°F for 10-12 minutes until crispy.
Special Equipment
- Thermometer: To monitor oil temperature and achieve the perfect fry.
- Shallow Bowls: For the dredging stations, as they make coating easier.
- Slotted Spoon: For safely transferring the onion rings from the hot oil to the plate.
Frequently Asked Questions (FAQ)
Can I use fresh mozzarella?
Absolutely! Fresh mozzarella will be even creamier but might be a bit softer, so chill the rings before frying for best results.
Can I bake these instead of frying?
Yes, bake at 400°F on a parchment-lined baking sheet for 15-20 minutes, flipping halfway.
Can I make these in an air fryer?
Air-fry at 375°F for about 8-10 minutes or until golden and crispy
Q: Can I make these in advance?
A: Absolutely! You can prepare the onion rings up to the breading stage and then freeze them on a baking sheet for 30 minutes before transferring them to a freezer-safe bag. When ready to cook, fry them straight from the freezer; just add an extra 1-2 minutes to the cooking time.
Q: What other dipping sauces work well with these onion rings?
A: Along with marinara and ranch, you could serve these with honey mustard, garlic aioli, spicy ketchup, or a sriracha-mayo blend for an extra kick. Experiment with your favorites and see what complements the cheese and onion flavors best.
Q: Are these onion rings messy to make?
A: Like most breaded recipes, they do involve a bit of a mess during the breading process. But setting up your dredging stations in advance and keeping a damp towel nearby for easy cleanup makes it more manageable. Plus, the end result is worth it!
Print
Cheesy Stuffed Mozzarella Onion Rings
- Total Time: 30 minutes
Ingredients
- 1 large yellow onion, peeled and sliced into thick rings (about ½ inch wide)
- 12–15 mozzarella sticks or mozzarella cut into 2-inch pieces
- 1 cup all-purpose flour
- 2 large eggs, beaten
- 1 ½ cups breadcrumbs (panko works best for extra crunch)
- ½ cup grated Parmesan cheese (optional, for added flavor)
- Salt and pepper to taste
- 1 tsp garlic powder (for extra flavor in the breadcrumb coating)
- Vegetable oil (for frying)
Each ingredient serves a purpose here:
- Yellow Onion: Sweet and mild, the perfect vessel for our cheesy filling.
- Mozzarella: Creates that oozy, melty center.
- Breadcrumbs: Adds the essential crunch to balance the creamy filling.
- Eggs: Helps the breadcrumbs stick and creates a thick, crispy coating.
Instructions
- Prepare the Onion Rings and Mozzarella Sticks:
- Peel and slice the onion into thick rings, about ½ inch wide.
- Separate the onion slices and carefully select the larger outer rings.
- Take a mozzarella stick (or piece of mozzarella) and place it inside the larger onion ring. You want the cheese to fit snugly within the onion. If necessary, trim the mozzarella sticks to fit.
- Set Up Your Dredging Stations:
- In three shallow bowls, set up the dredging stations:
- First bowl: Add flour.
- Second bowl: Beat eggs with a pinch of salt and pepper.
- Third bowl: Mix the breadcrumbs, Parmesan (if using), and garlic powder.
- In three shallow bowls, set up the dredging stations:
- Dredge the Onion Rings:
- Take each stuffed onion ring and dredge it in the flour, making sure it’s evenly coated. Shake off any excess flour.
- Dip the floured onion ring into the egg mixture, allowing any excess egg to drip off.
- Press the onion ring into the breadcrumb mixture, coating it well on all sides. Repeat this process to ensure a double coating, which will help the cheese stay enclosed and add extra crunch.
- Heat the Oil for Frying:
- In a large, heavy-bottomed skillet or pot, pour vegetable oil to about 2 inches deep.
- Heat the oil to 350°F (175°C). Test the oil by dropping in a small piece of breadcrumb—if it sizzles and turns golden, it’s ready.
- Fry the Onion Rings:
- Carefully place 2-3 onion rings at a time into the hot oil, making sure not to overcrowd the pan.
- Fry for about 2-3 minutes on each side or until golden brown and crispy.
- Use a slotted spoon to transfer the fried onion rings to a plate lined with paper towels to drain any excess oil.
- Keep Warm:
- For batches, you can keep the fried onion rings warm in a 200°F oven until all rings are fried and ready to serve.
Nutrition
- Serving Size: 15
- Calories: 150
- Fat: 10g
- Carbohydrates: 10g
- Protein: 5g
Conclusion
And there you have it—Cheesy Stuffed Mozzarella Onion Rings that are crispy on the outside, gooey on the inside, and bursting with flavor in every bite! These onion rings are so much more than just a snack; they’re a crowd-pleaser that will make everyone around the table smile. Whether you’re sharing these at a party, making them for family game night, or just treating yourself to an indulgent snack, these rings deliver a perfect balance of crunch and creaminess.
If you give this recipe a try, be sure to share your creation! I’d love to see your photos and hear about any twists you put on them—maybe a spicy variation or a unique dipping sauce? Happy cooking, and enjoy each cheesy, crispy bite!
If you try them, I’d love to see how they turned out! Don’t forget to snap a photo, share it on Instagram, and tag me. Enjoy every crunchy, gooey bite, and happy snacking!

